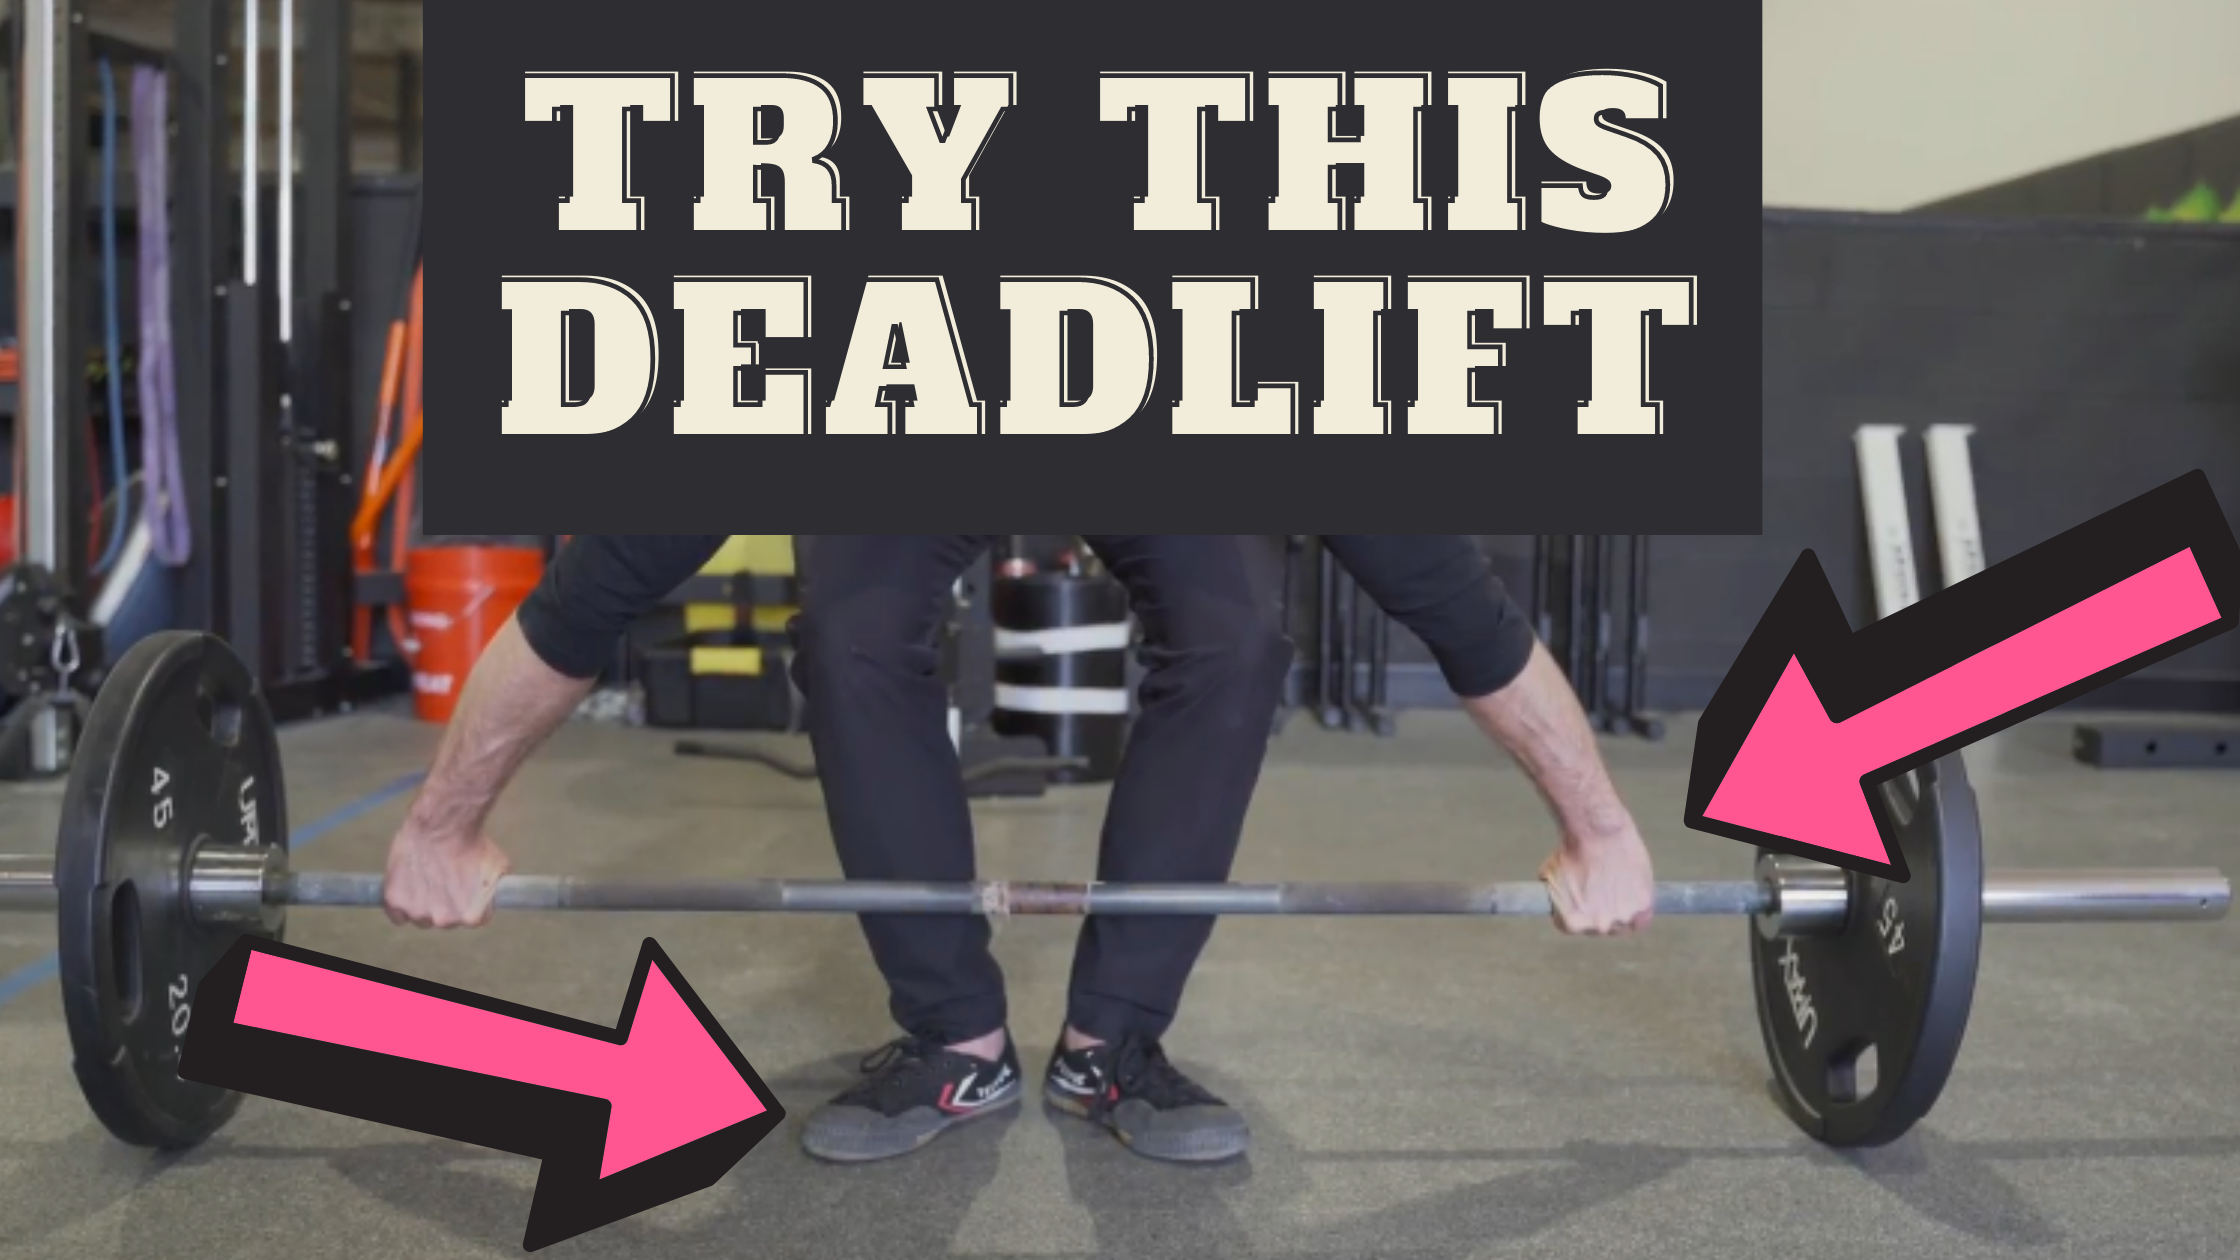
Try This “Hybrid” Deadlift

Want to get strong?

Like, REALLY strong?

Then you must become a student of the deadlift.

But we’re not just talking about doing a lot of deadlifts…

We’re talking about being a mad scientist in the deadlift laboratory. Testing, experimenting, and putting everything under the microscope of performance.

Picking up weight off the ground is a fundamental strength skill. This family of fundamentals also includes pressing, pulling, squatting and loaded walking.

Under each fundamental pattern, we can perform any number of variations to suit our unique training needs and body types.

Most lifters get acquainted with the two main styles of deadlift (sumo and conventional) and train solely with the one that promises the most weight on the bar.

Lifting heavy is an obvious part of the strength game, but grinding away at the same movement pattern for years on end is not only boring, it leads to plateaus and unnecessary wear and tear on the body.

That’s why we go back to the lab – to find exercises that will keep your training fresh, fun and fill gaps in your strength.

And when it comes to the deadlift, there are two easy places we can start experimenting – the foot stance and grip width.

Here’s a funky deadlift that takes each of those to the extreme:

The Duck Stance Snatch-Grip Deadlift

My clients and I love this lift.

Get ready for some new sensations…

Let’s take a look at the grip first.

THE SNATCH-GRIP

The ultra-wide grip is an Olympic lifting technique used in the (get ready for it) barbell snatch.

Start with a grip about thumbs-length outside the ring. Move in a bit if this feels tweaky on your wrists.

For deadlifting purposes, a wide grip gives us a few unique training benefits:

  • Grip strength
    • Your fingers and forearms work extra hard in this outstretched position
  • Upper back strength
    • This position demands more lat and upper back engagement compared to traditional deadlifts where the arms hang straight down
  • Off-the-floor strength
    • The snatch-grip deadlift mimics a deficit deadlift position as your hips and torso start much lower. This deeper setup will help refine your technique at the bottom range of motion.
  • Leg strength
    • As mentioned above, the SG starting position requires more knee and hip flexion. This brings in more use of the quads and has a squat-like feel.

In sumo and conventional deadlifts, the arms are kept straight and vertical. This is absolutely necessary for lifting the most weight possible in a safe and streamlined way.

Beginners should master this traditional “closed” arm angle and be confident in their lat control before “opening” into a wider grip.

THE DUCK STANCE

I was introduced to the duck stance deadlift at a seminar some years back as a training option for those with tight hips.

I tried it and immediately felt a new kind of “wedge” that seemed to help my legs, hips, and back play nicely together.

Dan John includes these in his Amor Building workouts and some of the strongest powerlifters in the world train and compete with a very narrow conventional setup.

Individual hip anatomy will influence how any deadlift stance works and feels, but the duck stance has been well tolerated, and even preferred, by everyone I’ve taught it to.

Curiously, this narrow stance allows the hips to start closer to the bar by way of pushing the knees/shins out to the side.

As with any squat or deadlift, experiment with toe-out angles and embrace asymmetry when it clicks. For example, keeping my right foot a few degrees straighter than my left often feels best on my hips and back.

ALL TOGETHER NOW

The more ways we have to deadlift, the better.

So many lifters get stuck on a single technique and subsequently have limited options for progress in training.

With the snatch-grip + duck-stance deadlift, we get to train the extremes…

The hands are as wide as possible and the feet are as close as possible.

When combined, we’re dealing with plenty of new stimulus while performing a simple movement.

PROGRAMMING

How does this hybrid deadlift technique fit into our training?

Here are a few ideas:

  • In the warm-up
    • Using harder variations of a lift to prepare for said lift is a favorite warm-up technique (Front squats before back squats or pause bench before touch ‘n go bench for example)
    • Try your first 2-3 warm-up sets with 6 reps of the SGDS
  • As the main lift
    • If you’re deadlifting 2x/ week, train heavy with your usual DL form one day and lighter with the SGDS the next (be sure to leave at least 2 days in between sessions)
    • If you’re deadlifting 1x/ week, alternate each week
  • As an accessory
    • This will be where most of us utilize powerlift variations
    • Keep the intensity high. Up to 8 reps, but 5-6 is usually the sweet spot
    • Because your upper back and legs are getting extra work, the SGDS might take the place of other accessories in the row or squat family

Once you’re handling enough weight that grip becomes a limiting factor in hitting your reps, by all means use straps.

Here’s a fun deadlift challenge for you:

  • Load a bar up 50-60% of your max
  • Perform 2 reps in a full SGDS position
  • Bring the hands in an inch or two, hit 2 reps
  • Repeat, moving the grip closer until your arms are vertical under the shoulders
  • Switch to a narrow sumo stance
  • Keep hitting doubles as you scoot the feet out 1-2 inches at a time into your widest comfortable sumo stance
https://www.instagram.com/p/CD2HBbknvdx/

Have fun!

Kettlebells for Brazilian Jiu-Jitsu

Wrestling was the one sport I showed any aptitude for as a kid.

I just didn’t have the discipline reserves to handle the long practices AND get my homework done. Yes, I was, and still am, way more nerd than jock.

The more I got into training and teaching kettlebells, the more I noticed my peers were involved in martial arts and specifically Brazilian Jiu-Jitsu.

Learning new skills is fun and important for personal development, but keeping a student’s mind is absolutely key for being an effective coach.

So it was that with a wild hair and some encouragement, I joined Legion BJJ in East Nashville.

My belt is still as white as my winter thighs, but I’ve already gained a mountain of perspective about the body that now impacts how I train and coach.

I was stoked when Professor Sean Patton asked me to help out with his kettlebell programming and to contribute to the team’s Youtube channel.

With that, here’s my hot take on the top kettlebell exercises for BJJ.

The Swing Is The Key To High-Performance Hips

Training the standard 2-hand kettlebell swing is a must for BJJ athletes. Here’s why:

The KB swing builds strength, power, and even flexibility in the hips.

That power is expressed through the hip hinge – simply the movement of the hips back (flexion) and aggressively forward (extension). Think about the mechanics of a bow and arrow and you’re on the right track.

When you learn how to hip hinge just right for your body, you’ll not only unlock more power, but also spare your back from unnecessary strain as well.

Every movement pattern gives us a unique weapon to use in our jiu jitsu. In this light, the hip hinge is the body’s “cannon.” And after all, the kettlebell is just a cannonball with a handle.

All else equal, you can create the most force against your opponent with the hips.

Learn the hip hinge. Power the hip hinge. The kettlebell swing is your ticket.

Boost BJJ Core Strength With The Single-Arm Kettlebell Swing

Nothing in jiu-jitsu is static or symmetrical. You must be prepared to “multitask” with your body – stable here, mobile there.

We can fortify ourselves against the randomness of rolling with asymmetrical training – simply using one side of the body differently than the other.

For the swing, we’ll just remove one arm from the kettlebell.

The basic technique remains unchanged, but the one-arm kettlebell swing will present an extra challenge to the core, grip, and upper body stability.

Some tips:

  • Stay “rooted” through the feet. Maintain tripod balance for the entire set and resist popping back on the heels.
  • Keep your hips and shoulders square.
  • Engage the lat and pec on the loaded side to create a stable shoulder.
  • Don’t over-tense the arm and grip.
  • Use your free arm to actively guide the swing. Don’t let it flop around.

Use This Kettlebell Swing For Even More Explosive Hip Power

“I fear not the man who has practiced 10,000 kicks once, but I fear the man who has practiced one kick 10,000 times.” — Bruce Lee

Most kettlebell swing workouts aim to stack up the daily volume, sometimes with multiple hundreds of reps. And it’s great to build your skill and work capacity up to that point.

But what if we go in the opposite direction and do as few reps as possible?

That’s where Power (or Dead-Stop) swings come in. Instead of swinging a kettlebell for multiple reps at a time, we perform the swing in singles.

The kettlebell is returned to the floor between every rep, eliminating all momentum and any boost from the stretch reflex.

This is exactly how powerlifters train “off the floor” strength with the barbell deadlift.

Generating tension, strength, and power from a dead stop is a unique and valuable physical skill… plus, it’s exhausting.

The Best Kettlebell Press For Resilient Shoulders


The secret to strong shoulders? The interplay of mobility and stability.

You’ll need plenty of both to stay healthy.

Shoulder pain is common enough in the general fitness population, but add the stresses of BJJ in the mix, and smart shoulder training becomes a non-negotiable.

Typical shoulder routines, and the way they are performed, do little to improve the the way the joint actually moves and functions. Your shoulders take a beating on the mat and most upper body workouts just add insult to injury.

There is a simple way you can hold the kettlebell that will automatically stabilize your shoulder, effectively engage the rotator cuffs, and prevent you from moving into dangerous ranges of motion.

Just grip it upside-down. Or in kettle lingo – bottoms-up.

With the BU technique, the bell is balanced above the hand. This requires the coordination of grip strength, elbow and forearm position, rotator cuff activation, and stability from the entire body (lats, core, hips, legs, feet).

If any of these points are compromised, the kettlebell will wiggle around in your hand. If you try to push beyond your ability, the kettlebell will fall. This is what’s known as a self-limiting exercise.

As demonstrated in the video, just holding the bell in the bottoms-up position is the first step. Once you are comfortable with the position, add the press movement as far as you can control (half-presses are totally fine).

The Turkish Get-Up: “Like yoga. With Weight.”

Focus under pressure is a must for the combat athlete.

The Turkish get-up delivers in spades with a sequence that takes you from lying to standing and back down, all while developing strength, mobility, and total-body coordination.

The story goes that Turkish wrestlers in the days of yore were tasked with standing up from the ground under a 100 pound stone as part of their training.

Today, the TGU offers an entire toolbox of drills, patterns, and exercises to increase resilience and athleticism for any trainee.

Programming Principles for BJJ

Now that we have the techniques, how do we program kettlebell workouts for BJJ?

First, let’s establish a few guiding principles for effective training.

  • Training should fill gaps
    • What do you need to work on? Work on it!
  • Training should enhance strengths
    • You’re strong. How could you get stronger?
  • Every exercise has a risk/reward ratio
    • Weigh the costs and benefits. What makes for a wise investment vs. a waste of time?
  • Respect recovery
    • You can do anything, but not everything.

Let’s write out a sample program for a BJJ athlete who wants to maintain a 5x/week training schedule.

Monday – BJJ class

Tuesday – Rest

Wednesday – Cardio + mobility and light BJJ class

Example —> Block #1 – Every Minute On The Minute x 10-15 minutes – 15-20 swings on even minute / 10 goblet squats on odd minute.

Block #2 – Slow TGU x 1-3 each side. Stretch, joint circles, bar hangs, ab work.

Thursday – BJJ class

Friday – Work capacity session

Example —> Block #1 – 5 Power swings into 10/10 1-H Swings into 15 push-ups. Rest 60-90 seconds and repeat for 6-8 rounds.

Block #2 – 100 2-H Swings for time then 30s jump rope / 30s farmer carry x 5 minutes.

Saturday – Strength session

Example —> Block #1 – Pull-up x 2, 4, 6, 8, 6, 4, 2 / bottoms-up press x 2 each side between each set

Block #2 – 5×5 Deadlift (60-80%) / Hanging leg raise or ab wheel

Sunday – Rest

Bonus Tips!


Release Tight Hips and Unlock Your Athletic Power

[Now Available] The Hybrid Hip Mobility Video


You may also like these latest posts:

How To Back Squat Like A Pro

Kettlebells for Crossfit Coaches (Workshop Video)

2 Crazy Partner Kettlebell Workouts


[Free] 21-Day Kettlebell Core Challenge Program


For more training ideas, be sure to follow me on Instagram

Try These Crazy Partner Kettlebell Workouts

It’s like looking in a mirror, only… not.” – John Travolta, Face/Off

We use lots of fancy stuff in the name of exercise.

Today’s cardio machines are basically iPhones you can run and bike on. Wearable tech promises optimal results through biofeedback monitoring.

But no matter how “smart” a certain training tool might be, nothing beats a real, live training partner.

Whether you need an extra push to finish that last set of squats or just some fresh workout ideas, a good gym buddy delivers every time. And you don’t even have to buy a new one every 12 months!

Partner workouts designed around games and creative constraints can inject a healthy bit of randomness into your movement practice. Not only are these types of workouts fun, but you’ll find yourself moving and thinking in brand new ways.

Here are two brutally tough partner workout ideas that utilize the bottoms-up kettlebell position. Beware if your partner is a little sadistic.

The “Traffic Cop” Bottoms-Up Kettlebell Press

The Rules:

One partner will lift and the other will play “traffic cop” by directing the movement with Stop and Go commands.

In our example, Savanna handles double bottoms-up kettlebells.*

I point out one side at a time to randomly start and pause the press motion.

*The lifter should choose a weight she can safely handle for 45-60 seconds.

Some creative constraints:

  • Work one arm per set
  • Work both arms together
  • Keep one arm in a static press (half-press, overhead, etc) and press with the other
  • Keep one arm in a suitcase hold (weight by your side) and press with the other
  • Perform in a 1/2 or full kneeling position

Of course, this exercise can be performed with dumbbells or kettlebells in a standard grip.

Major Benefits

The bottoms-up kettlebell press is a proven staple in the toolbox of smart shoulder training. Rotator cuff activation and scapular control are the big players in any BU exercise.

Keeping the kettlebell upside down requires a combination of grip, balance, focus, and total body engagement. Lose any of these, and the kettle comes crashing down. Start light!

When training any movement with a long range-of-motion, it’s important to own all angles from start to finish in order to develop and maintain well-rounded strength.

Every lift has a sticking point – an angle where you experience a lapse in strength, stability, or control. This is why powerlifters train paused squats, bench presses, and deadlifts at various heights. Isometric tension help fill movement gaps.

Finally, having to instantly react to your partner’s cues will hone your concentration. You’ll discover subtle ways you can hold, lose, and regain control of the movement.

Taken together, we have quite the stack:

Bottoms-up + Isometrics + Randomness/Reaction

The result?

A bullet-proof press and boulder shoulders to match.

Having fun yet? Just check this one out…

The “Copy Cat” Kettlebell Workout

The Rules:

Set a timer for 1-2 minutes.

One partner will lead a movement flow (no ballistic lifts), the other will attempt to match and mirror the movements exactly.

Some ideas:

  • Make (and match) faces ????????????
  • Write words in the air with your hands and feet
  • Move to the beat of a song
  • Vary the speed
  • Pause at various angles

Get creative and think outside the typical lifting box.

And be nice to your partner 😉

Major Benefits

Our brains are wired to imitate and learn by observing others.

Mirror neurons are those that fire when you perform an action AND when you see someone else performing that same action.

In a sense, we have an innate ability to get inside each other’s heads.

For this exercise, the follower is playing out both sides of the process in real-time, observing the movement and acting it out.

As the poet Ludacris put it – “When I move, you move. Just like that.

This game is all about staying in the present moment. As the follower copies the leader, he finds the flow in deep focus on action but without time to get hung up on his own technique.

And should you choose to play around with bottoms-up kettlebells, you’ll get all the benefits described above, too.

So grab your partner, do-si-do, and keep on kettlebellin’.


Want more killer kettlebell workouts?

Join my private Facebook group here.

(Fitness Coaches) How To Get Started With Online Training

The internet has completely changed the fitness industry.

You can get a world-class education from the blogs, social media posts, videos, and products that come from smart coaches (unfortunately, you might also have to wade through some cringe-worthy kettlebell swings along the way). 

We are connected now more than ever, and that means two powerful things: 

  1. We can easily find and network with people across the world to strengthen the bonds of our community, and 
  2. We can reach others with our message fast and cheap.

This may seem painfully obvious. Technology has infiltrated nearly every facet of our lives (you’re reading this on a computer screen after all). 

Yet most of us aren’t utilizing technology to its fullest potential. As strength coaches, we have valuable skill sets that can benefit practically everyone. While in-person training may remain your bread and butter, I encourage every instructor with a passion for coaching to explore online training.

In this article, I’ll show you a few key concepts to help you get started and share some powerful tools that will simplify your job as an online coach.

Instagram is the New Wild West

Online coaching is still very much a new thing.

There is little precedent to show how it’s done, and many coaches are apprehensive about starting because of the lack of a proven playbook. The good news is that if you have at least a couple of years of in-person coaching experience, you’re already ahead of most.

While I hope that you’ll come away from this article with some tactical strategies you can immediately swipe and deploy, I’d be remiss if I didn’t emphasize the most important coaching quality, regardless of the medium: having empathy for your student. Put yourself in his or her shoes. What are they potentially nervous about? What do their goals mean to them? Are you coming across as a trusted advisor? 

It may not be as easy to connect in this way when two people are not in the same physical location, but it’s still every bit as important for the quality of the coaching experience. Many fitness authorities fail to respect the role of empathy, and as a result, online coaching (and the fitness industry at large) gets a bad rap.

Who Are You Speaking To?

Online, you can communicate with nearly anyone in the world. So who do you choose?

The types of students you attract and work with fundamentally define your business.

The traditional way people try to identify their ‘customers’ is with demographics: age, gender, occupation, etc. The kind of information you’d find in a census. This is almost never useful.

To truly understand (and therefore best serve) your customer, you must dig deeper. Your prospects’ beliefs, their pain points, how they see themselves, and how they see the world reveal how and why they make their choices. These are psychographics, and they hold the key to standing out in a crowded market. 

To quickly focus your marketing message, you can start by asking yourself two things—perhaps the most important questions for your business:

  1. What does your prospect know and believe about your service/product?
  2. What must your prospect know and trust in order to invest in and experience success with your service/product?

Using online coaching as our example:

Are, are you speaking to people who understand the benefits of your training methods?

Do they think they have to be tech-savvy to start online coaching?

Do they believe they have the ability to commit themselves and achieve success under your guidance? 

Bridging the gaps between these questions can be tough, but that is your first and most important role as an ethical marketer and coach. Having a deep understanding of who you are talking to will influence everything in your business—from what you post on social media to how you price and deliver your services.

Communication: Making or Breaking the Coaching Experience

A successful online coaching relationship must adhere to the same basic principles necessary for in-person training, and healthy communication tops the list. You aren’t face-to-face with your student, which means you must take proactive steps to avoid misunderstandings and miscommunications before they happen. Trust me, they can happen pretty easily.

Let’s examine the role of communication in three key places that make or break the coaching experience:

  1. The Application Process: Ensuring a Good Student-Coach Match Upfront

Your coaching service isn’t a simple commodity or product that ‘just’ anybody can buy. 

It’s a two-sided coin. On one side is the ideal student who values your expertise, cares about the process, and does the work while feeling respected. On the other side is you, offering your knowledge, insight, skill, time, and energy. You must feel that the relationship delivers value too. The application process is the first step to making sure the fit is right for both parties.

Here are some questions and topics to bring up:

  • Training history
  • Previous coaching experiences (what worked and what didn’t)
  • Short and long-term goals
  • Injuries and other lifestyle considerations that impact training
  • Why do you think we would make a good fit?
  • How important is this to you?
  • Are my services something you can fit into your budget?

As you see, it’s less of a ‘sign-up,’ and more of an application for your services. Prospects that care enough to provide thoughtful answers make the shortlist. The application process itself doesn’t have to be hard or complicated. It can be embedded on a web page, sent on a Google Form, or simply in an email. 

2) The Follow-up: Cherry Picking from the Short-list

Great, you’ve got a promising applicant. The next step is some form of human contact—a phone call or Skype—to break the ice, confirm the fit (people do ‘stretch’ the truth on applications), and describe how your online training works. If all goes well, ask for their business. Then you can set expectations and get started.

Don’t short change “confirming the fit.” It’s as important for them as it is for you.

How many students have you had, in person or online, that cared less about their training than you did? This is a recipe for much frustration and sub-standard results.

Review the application questions carefully. Does anything stand out that needs addressing or more probing? Listen intently. This is the most important skill you can develop. Be sure you understand what your student wants and needs, and what their major challenges and concerns are. And maybe most importantly for online coaches – what their interaction expectations are.

Once you’ve confirmed a good fit, and are sure you have a grasp on how you can help this person best, explain your process and set the training expectations:

  • How will the training be delivered (email, programs, videos, etc.)?
  • What is the cadence and method of check-ins and feedback?
  • What are the terms (payment schedule, start date, end date, renewal policy, etc.)?

Once you are both in agreement to proceed, send over a welcome packet that includes FAQs, onboarding materials, payment instructions, etc.

If, for any reason, the fit isn’t right for either party, take it upon yourself to direct the student elsewhere for help (refer to medical professionals, other coaches, programs, or methods as appropriate).

3) The Check-ins

By the time your student has gone through your application, short-listing, and onboarding process, the coaching relationship should be on solid ground with a clear vision for the future. Of course, building trust takes time. So does developing an intuition for what each student will respond best to. Regular check-ins will help you create better programs and ensure they feel supported.

There are no hard rules for check-ins. Your method will likely differ according to how you design your service packages, the nature of the training program, and your student’s preferences.

Here are a few ways to keep in touch:

  • Daily to weekly emails (keep these concise)
  • Weekly, bi-weekly or monthly phone/Skype calls
  • Request videos of specific lifts for technique review
  • Private Facebook group

Putting It All Together: The Online Coaching Checklist

Now that we’ve covered the softer skills, here’s how you can get started today with tools that are cheap or even totally free.

Remember two things. First, there is no “best way;” only that which works well enough for you and your students to stay consistent and make progress.

Second, you don’t need to start with an empire. Just like a press or squat, it starts with the empty bar. Next, I’ll talk about the ‘funnel,’ from helping people find you with great content to dealing with inquiries. Finally, I’ll get to the easy tools you can use to quickly test those online training waters. 

  1.  Get the word out

Now, we begin the process of putting ourselves out there. And the best, most proven way, is by building your authority.

If you’re reading between the lines, this is called sharing your expertise… for free.

Once you understand who you’d like to serve, your marketing goals are really quite simple: create content that positions you as an authority, demonstrating that you understand their concerns, challenges, and interests, and shows that you can help them (maybe even how). 

Social media is a great place to start. Here’s how that might look on Instagram:

You post a single leg deadlift video and explain in the caption how it benefits people who enjoy trail running. You include pertinent hashtags so people who care about running—and maybe getting better at it—can find your post. For example #trailrunning #runhappy #mountains #instarun. Check out best-hastags.com for more ideas. While a #singlelegdeadlift hashtag is good, it doesn’t resonate to anyone outside of single leg deadlift lovers. In marketing lingo: think of that as a feature, whereas #runawesome is the benefit. I want to improve my single leg deadlift versus I want to run better, faster, longer.

Don’t stop there, and don’t play passive. Take the initiative to start actual conversations with people and always respond to comments and questions. Search those same terms yourself and leave thoughtful comments on other people’s posts. Take note of what trail runners are struggling with and what they share. This is the best form of market research.

Here’s a Facebook example:

You post your “3 Quick Tips for Better Posture” list in a status update and explain why these are beneficial for classical musicians who have to sit with their instruments for long periods of time. You then find a few Facebook groups for classical musicians and participate in the conversation. You establish yourself as the fitness authority in these groups by sharing your list and following up with comments and questions.

2. Handle inquiries 

Once people are interested, they need a place to go. Either to contact you directly or to do some extra due diligence to see if you are legit. Consider a “home base” where you can send interested prospects that explains more about you, the type of people you help, and how you help them.

Your website, if you have one (WordPress can host a basic blog for free), is perfect. But you can also make a Facebook business profile, or you could simply make a .pdf (which can be done in Google Docs) that serves as an emailable “expanded business card.

3. Present the application

Already covered above. Your “apply to train with me” can be delivered via email, Google Form, or even in direct messages.

Streamlining communication

Here’s a list of free tools for delivering your programs and keeping in touch.

  • Calendly.com allows anyone with your custom link to book a call time directly. Because it syncs to your personal calendar, you’ll never have to worry about time zones or double booking.
  • Google Sheets is an easy way to create, share, and organize your training programs.
  • YouTube is the undisputed king of video. Upload your own technique reference videos and set them to “unlisted” if you only want your clients to see them. You can then embed the video link directly into your program spreadsheet.
  • Skype, Zoom, or FaceTime (for Apple users) can be used for video calls. This is especially helpful if you need to coach someone in real-time.
  • PayPal, Venmo, and Stripe are all reputable and user-friendly payment processors.
  • Mail Chimp is an easy way to get started with email marketing.
  • Facebook and Instagram are the two major social media platforms. Even if you don’t use both regularly, at least register a username and direct people where you want them to go.

Admittedly, this is a lot to take in. So if you’re feeling overwhelmed, just relax and remember that you don’t need to do all this at once.

Just like in training, pick a goal or area for improvement and focus on it relentlessly until it becomes a strength. If you can handle 12-hour days on the gym floor, you have the work ethic to figure this stuff out.


Want more no-BS strategies to stand out and make an impact in a noisy fitness world?

Click here to get my free, coaches-only emails and snag these bonuses:

  • The #1 Thing Your Social Media Posts Are Missing
    • Adding this simple line can boost engagement and grow your business
  • Get Started With Email Marketing
    • Learn how this underrated platform can revolutionize how you earn business online and in-person
  • Write Better Program Templates
    • The little details matter!  Get a behind-the-scenes look at how I create digital programs that people actually enjoy doing.

“Zack has a great way of communicating the message and power of effective marketing when it comes to social media. Technology is coming at us fast so to navigate through it all having a resource like Zack is a lifesaver.” — Betsy Collie

Click here to get going.

Kettlebells for CrossFit Coaches (Workshop Video)

Hold on loosely. But don’t let go.

When people ask my opinion on CrossFit, I always say it comes down to the coaches.

At this point, there is enough differentiation in the industry where it’s not appropriate to make sweeping generalizations – good, bad, or otherwise.

The best gyms (CrossFit or otherwise), operate in a culture of fun and learning. That is certainly the case with Whole Strength CrossFit in Nashville.

Owner Ryan Stemper invited me out to host a workshop for his staff of coaches and competing athletes. We covered the basics and progressions of the ballistic kettlebell lifts (swings, cleans, snatches), bottoms-up lifts, and more.

Check out the workshop video and timestamps below.

(And don’t mind the shiner – caught a hard knee in jiu-jitsu!)

Timestamps:

2:30 – 90/90 Breathing

6:15 – Kettlebell Simple & Sinister Warm-up (Halos, Prying Goblet Squat, Glute Bridge)

20:45 – Kettlebell Deadlifts

29:07 – Hike Pass

32:40 – 2-Hand Kettlebell Swing

44:52 – 1-Hand Kettlebell Swing

56:30 – Partner Swing

1:01:50 – Hand-to-Hand Swing

1:03:45 – Kettlebell Rack Position

1:07:11 – Clean Drop

1:10:00 – Kettlebell Cleans

1:14:36 – Kettlebell Snatch

1:29:36 – Dan John Get-Back-Ups

1:33:39 – Bottoms-Up Clean & Press

1:44:40 – Bottoms-Up Squat


Interested in hosting me for a workshop experience at your facility? Drop me an email (Subject line: Workshop)

Topics may include: Beginner to advanced kettlebell skills, powerlifting, programming, coaching skills, and marketing.