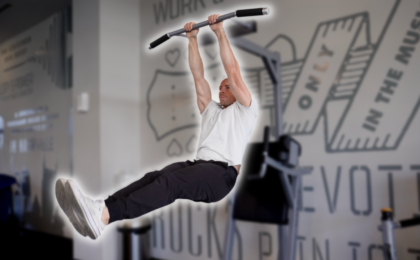
How To Get Your First Pull-Up

For many of us, our first attempt at pull-ups was in front of a clipboard-wielding gym teacher.

Maybe you got a few shaky reps.

Maybe you strained and slipped off the bar after just a few seconds.

Maybe you were left discouraged and quietly accepted that you were “bad” at pull-ups…

Now years later, you want to finally conquer the pull-up (and silence that negative inner voice) but that first rep still feels impossible.

Most pull-up training advice amounts to: “Add bands and grind out negatives until something clicks.”

For some, it eventually works.
For most, it doesn’t.

They struggle for a while, get sore elbows, and eventually give up because there’s no real plan…

So in this post, I’m breaking down the exact exercise progressions that will give you the strength, skill, and confidence to finally get your first pull-up, even if you’re brand new to working out.

If you’re new here, my name is Zack – I’ve been a personal trainer and strength coach since 2012. Over the years I’ve helped a bunch of people to get their first pull-up (and beyond) – from middle-aged soccer moms who just started working out to former CrossFitters who finally ditched the kip.

There are three things you need to do a pull-up:

#1) Dynamic pulling strength of your back and arms to lift your body.

#2) Isometric strength of your grip and core to support and stabilize your body.

#3) The neurological skills to coordinate all of the above to create a strong, smooth pull-up.

My pull-up road map takes those basic ingredients and organizes them into three levels, each with their own performance standards to stair-step you into your first pull-up.

Let’s go!

Level 1 Pull-Up Exercises

Most trainers would have you immediately jump up on a bar and start with bar hangs or pull-up negatives.

Those are great exercises, but they’re also pretty advanced.

So, if you’re a beginner, let’s start with some exercises that are more approachable, scalable, and build your foundation.

For pulling strength, the obvious place to start is the lat pull down.

Start from a full stretch position, arms outside shoulders, and strive to touch the bar to your upper chest with every rep. This will ingrain the best pulling pattern for full range of motion pull-ups.

Work up to five reps at a resistance of about 50% of your body weight.

Farmer carries are a great way to build functional grip strength.

Simply grab a pair of dumbbells or kettlebells and take them for a walk.

Stay tall and try not to wobble too much.

Work up to 1/3 of your bodyweight in each hand for a 30-second carry.

For nailing the basics of core stability, it’s hard to beat the classic plank.

Tighten every muscle in your body. Think about driving your elbows and toes towards each other to really maximize core engagement.

Work up to a 30-second plank while maintaining full-body tension.

Level 2 Pull-Up Exercises

Now that you’ve built a solid foundation of general strength, you can start training with more specificity… and that means lots of bodyweight exercises and time on the pull-up bar.

We’ll start with a variation on the classic bodyweight row that I call the “Seat Row.” This little known exercise bridges the gap between your horizontal and vertical pulling strength, further strengthening and coordinating all the muscles involved in the pull-up.

Set up a suspension trainer or fixed bar to a height that allows you to hold this hanging tabletop position. Knees bent, feet flat, and your back approximately parallel to the floor. Simultaneously pull your hands to your shoulders and sit your butt straight down.

Hold the top flexed arm position for 3-5 seconds to build lockout strength before slowly reversing course back to the tabletop position.

After some practice, float your feet at the top for a full flexed arm hang. Work up to three sets of five reps.

Your level 2 grip strength comes with hang time on the bar. But rather than simply hanging on for dear life, you’re going to perform a progression called the scapular pull-up.

Grip a bar just outside shoulder width. Relax your back and allow your shoulder blades to elevate – basically shrugging the shoulders up to the ears. With the arms locked out straight, pull the shoulders down and away from the ears. Think about pushing the hands forward, causing your head to move slightly back. If you’re having trouble with the free hang, unload some of your body weight from your hands by planting your feet.

The scap pull-up not only develops grip strength and endurance, but the movement itself is a key first step to engage the lats in full range of motion pull-ups. Work up to a set of 10 free-hanging reps.

Your level 2 core exercise is the hollow body hold, and this is the basic shape you’ll want to maintain on the bar for strict pull-ups.

The hollow body position improves pull-up performance by supercharging your core strength, keeping your torso stable, and putting your shoulders in the best possible position for a lat engagement and a strong lockout.

Tighten your abs to press your low back into the floor with the ribs down and a slight pelvic tilt. Raise the shoulders slightly and reach the arms overhead, biceps by the ears. Match that same angle with the legs. Point the feet at about 30° with tight quads and glutes.

Work up to a 30-second hold.

Level 3 Pull-Up Exercises

Now that you’ve developed strength in the top and bottom position of the pull-up, we’re going to fill the gap between them with pull-up negatives.

By working just the negative or lowering portion, you’re going to build the strength and coordination at the same angles and positions required in a standard pull-up.

Get to the top of a pull-up with a jump or ideally from a box to minimize swaying. Slowly lower yourself down to the straight arm hang position while keeping a hollow body shape. Rest and reset after every rep. Try these with a chin-up grip or a neutral grip if you’re having trouble controlling the lockout and slow tempo.

For bonus, pause at various angles on your way down to really shore up your strength. Work up to five reps of 5-second negatives.

We’re supercharging your level three grip and core strength with hanging leg raises.

From the hollow body hang, exhale as you fold like a jack knife, pushing your hands forwards while driving the legs up. Allow the low back to round as the abs flex to tilt and raise the pelvis. Inhale as you lower your legs under control and squeeze your glutes to prevent swaying.

Hanging leg raises will solidify your control on the bar and are worth training for the core strength benefits alone. Work up to five strict hanging leg raises.


Once you can consistently hit the level three standards, hop up on the bar and go for your first pull-up.

If you got it, congratulations!

If not, you’re really close and you might even be able to perform a pull-up with a different grip orientation, like the chin-up, neutral grip, or the commando pull-up.

These are all great exercises in their own right and are useful for adding variety to your pull-up training.

One more technique to get you over the bar is using assisted reps and there are two ways to go about it.

First is self-assisted pull-ups.

Push your feet down against a box as needed to facilitate full range of motion reps. You can obviously do this on the floor by racking a low barbell.

Second is the partner assisted pull-up.

Have your training partner help you over the bar by pushing up and into your mid-back (not against the feet). This will help you keep a strong hollow body brace.

Finally, and to address the obvious, your bodyweight has a big impact on your pull-up performance.

So, if this is a serious goal for you and you’re still struggling with those level two or three standards, consider losing weight alongside your strength practice. Even 5 lbs can make a huge difference.

In any case, don’t rush this process and squeeze all the strength gains you can from each step along the way. Every progression here is super valuable. So, in the pursuit of pull-ups, you’re going to develop phenomenal upper body strength!

There are a ton of methods out there for mastering pull-ups, but I tried to make this one as simple and fool-proof as possible based on my own coaching and training experience.

And if you want to follow a comprehensive program that coaches you through the entire process of getting your first pull-up (no matter what level you’re starting at) check out the Pull-Up Transformation Course.

How To: Hanging Leg Raise (Beginner to Advanced Progressions)

When it comes to abs, bodybuilders and strength athletes agree…

The hanging leg raise is the king of core work. 

A strong core is foundational to a strong body.

The strength you develop through hanging leg raises will improve your performance across all sorts of lifts –  from bodyweight calisthenics like pull-ups and push-ups to powerlifts like squats and deadlifts.

The leg raise can be used to hypertrophy (grow) the abdominal muscles to get the six-pack look.

The full hanging leg raise also provides a great dynamic stretch for the posterior chain muscle groups of the hamstrings, hips, and low back.

Hanging Leg Raise Muscles Worked

The hanging leg raise is a classic calisthenic exercise that engages multiple muscle groups – contributing to improved abdominal strength and stability, grip and forearm strength, shoulder and spinal mobility, and overall functional fitness.

Here are the primary muscle groups targeted by the hanging leg raise.

Rectus Abdominis 

The rectus abdominis, often referred to as the “six-pack” muscle is prominently activated during hanging leg raises. This muscle runs down the front of the abdomen and is responsible for flexing the spine.

Hip Flexors

The hip flexors, including muscles such as the iliopsoas, are heavily involved in raising the legs.

The HLR requires controlled contraction of the hip flexors to lift the legs towards the torso.

Obliques

Both the external and internal obliques, located on the sides of the abdomen, are engaged to stabilize the pelvis and prevent excessive swinging during leg raises. This helps to enhance lateral core strength and definition.

Transverse Abdominis

The transverse abdominis acts as a deep stabilizing muscle that wraps around the abdomen like a corset. It is activated during hanging leg raises to provide stability to the spine and pelvis.

Lower back (Erector Spinae)

While primarily a core exercise, hanging leg raises also recruit the lower back muscles, specifically the erector spinae, to a certain extent. These muscles work to maintain spinal alignment and prevent hyperextension during the leg lifting movement.

Hip Adductors

The inner thigh muscles, known as hip adductors, are engaged as the legs are lifted and brought together in the midline of the body. This adds an extra dimension to the exercise, involving the inner thighs in the movement.

Forearms (Flexors & Extensors)

The muscles of the forearms are heavily involved in maintaining a firm grip during any hanging exercise. Both the flexor muscles (on the palm side) and extensor muscles (on the back side) work to stabilize the wrists and elbows and support the body’s weight.

Latissimus Dorsi (Lats)

The lats are large muscles on the back that extend from the lower spine to the upper arm. They are involved in HLRs as they help depress the shoulder blades, providing stability in the hanging position.

Hanging Leg Raise Proper Form:

Grab a pull-up bar with a shoulder width or slightly narrower grip.

Flex the quads, glutes, abdominals, and lats into a hollow body shape.

Exhale as you fold like a jackknife – pushing your hands forward while driving the legs up. 

Allow the low back to round while the abs flex to tilt and raise the pelvis. 

Actively push your shins into the bar to maximize the contraction, driving your hands forward isometrically.

Inhale as you lower your legs under control, finishing back in the hollow body shape.

The hanging leg raise should be performed with an emphasis on slow, steady movement. Don’t rush or use momentum.

Keep your glutes and lats tight at the bottom to prevent swinging into the next rep. 

Top 7 Hanging Leg Raise Progressions

The strict hanging leg raise is a tough exercise and is a rare sight in most gyms. 

It’s an exercise worth doing if you want to truly maximize your total body strength, but don’t expect to pull off a perfect set on your first try.

There are many dozens of leg raise progressions you could do for general core strength…

But I’m going to show you 7 key exercises (in order) that will help you develop the skill and strength for full hanging leg raises.

Progression #1) Floor Leg Raise

First, we’ll actually perform the hanging leg raise movement on the floor.

Rack a barbell low so it sits close to the ground.

(You can also use a dowel rod speared between two heavy kettlebells)

Begin by emphasizing the negative (or lowering) part of the rep: Tuck your knees into the chest, roll back, and reach the feet to the bar. Contract your abs hard and slowly lower the legs.

Start by pausing and reversing the movement at 90 degrees, eventually moving all the way out to the full hollow body position.

Progress to the full leg raise pattern and lower the anchor point of the grip to help open the shoulders.

Progression #2) L-Sit Hold

This exercise will develop the strength of your core, deep hip flexors, and triceps.

Sit on a bench or chair and grasp around the edge. Tuck your knees up as you push down with straight arms. Your butt will float off the bench. 

Work on extending the legs out into the “L” shape. This is a great exercise for building high-tension core strength without fatiguing the grip.

Progression #3) Hanging Knee Raises

Jump up on a pull-up bar and adopt a hollow body position.

Simply tuck the knees as far up to the chest as you can control.

Move slowly – exhaling with the raise and inhaling as the knees lower.

Remember to keep the lats engaged by pulling the shoulders down away from the ears and pushing the hands forward.

Progression #4) Weighted Knee Raises

For your next progression, we’ll simply add load to the hanging knee raise.

You have a few options for adding weight.

You can grasp a dumbbell or medicine ball between the feet, hang light kettlebells from the toes, or simply wear heavy boots.

This step will solidify your hollow body shape, overload your grip, and strengthen the hip flexors and low abs.

Progression #5) Frog Raises

Now we’ll start incorporating more of the straight-leg shape to add leverage to the abs and work the flexibility of the posterior chain.

The Frog Raise starts as a bent-knee raise.

Pause at the top, straighten the legs out into an “L” shape, and keep them straight all the way down.

You can add micro-progressions here by straightening one leg at a time, or lowering in the middle split position.

Progression #6) “L” Raises

From a hollow body hang, lock your legs out strong and lift them up until they’re parallel to the floor.

Pause to ensure there is no momentum and slowly lower down.

Bonus: Perform a pull-up at the top of the “L” raise to further strengthen this shape.

Progression #7) Hanging Leg Raise Negatives

The last progression is working the slow negative (lowering portion) of the full hanging leg raise.

Just like we did on the floor, tuck the knees up and reach your shins to the bar.

Pause in this fully contracted position and slowly lower your legs.

Challenge yourself by adding pauses at various ranges of motion to ensure you’re maintaining control.

If you’re feeling limited by your flexibility or core strength, try these with one leg bent at a time.

Bonus Variations

I’d be remiss if I didn’t address the fact that hanging leg raises require a tremendous amount of grip strength and shoulder mobility.  

While grip strength and shoulder mobility are part of the total package of benefits you get from these exercises, they can also be major limiting factors (especially after fatiguing moves like heavy deadlifts). 

You can remove the grip and shoulder considerations almost entirely and still get in some great core work by performing many of these progressions on a captain’s chair, parallel dip bars, or while using arm straps.

Programming the Hanging Leg Raise

Treat the leg raise (and its progressions) like any other strength lift – performing 3 – 8 repetitions for 3 – 5 sets.

Because leg raises tax the grip and core musculature, I recommend performing them after your heaviest lifts in a session.

Once you’ve mastered the hanging leg raise, you can of course push that volume higher… just remember this is a lift that emphasizes controlled tension. 

Doing a million reps kind of defeats the training purpose and either means that you need to choose a more challenging progression or you need to tighten up your technique. 

The Ultimate Guide to the Kettlebell Swing

The swing is a fat-burning athlete builder.” – Dan John

The dynamic full-body workout you get from kettlebell swings is unbeatable.

Power, strength, cardio… it’s all here (and then some).

The kettlebell swing is pretty close to a perfect exercise with its mix of dynamic power, total-body engagement, and fluidity.

Whether you’re a fitness enthusiast looking to take your performance to the next level or a total newbie hoping to get started right, the swing will set you on the right path.

In this comprehensive guide, we will delve into the mechanics, benefits, and step-by-step techniques required to master the art of the kettlebell swing.  

Kettlebell Swing Muscles Worked

What muscles get worked in the kettlebell swing?

Most of ‘em.

Especially when you perform your swings the way I’m going to teach you.

The swing is a hip hinge exercise and the prime movers include the posterior chain muscle groups of the hamstrings, glutes, spinal erectors, lats, and upper back.

You’ll also get tremendous activation in the quadriceps, core, chest, and arms as well.

The kettlebell swing is renowned for its exceptional ability to improve cardio endurance.  

The high-intensity, explosive nature of the move quickly spikes the heart rate, as your heart and lungs work harder to deliver oxygen-rich blood to the working muscles.  This consistent demand on the cardiovascular system gradually increases its capacity to efficiently transport oxygen and nutrients, leading to improved endurance over time.

Moreover, the repetitive and dynamic nature of kettlebell swings promotes a steady flow of blood and oxygen, resulting in heightened lung capacity, enhanced VO2 max (the maximum amount of oxygen your body can utilize during exercise), and an overall improved ability to sustain physical activity for extended periods.  

This unique combination of explosive movement and continuous effort makes kettlebell swings an outstanding choice for individuals seeking to elevate their cardio endurance levels.

Learning the Kettlebell Swing

I’ve taught hundreds of clients how to swing a kettlebell over the years.

Some athletes pick it up on the first try.

But most folks need to work through a series of progressions to get it right.  

While the swing itself is relatively simple, there are tons of details involved in optimizing for both performance and safety.

Unlike many exercises, you can’t simply stop in the middle of a rep to correct a mistake.

Once you start swinging, any adjustments have to be made on the fly.  That’s why it is absolutely crucial to have a clear understanding of the swing and a step-by-step method to work up to it.

Now let’s take a look at the sequence I take new clients through to make the learning process as seamless and efficient as possible.

Step 1 – The Kettlebell Deadlift

The deadlift is the fundamental loaded hip hinge movement.  

And it just so happens that deadlifting with a kettlebell is the best way to learn this pattern (as opposed to a barbell) thanks to the design of the kettlebell itself.

How to perform the kettlebell deadlift:

  • Stand over the bell so your ankle bones line up with the handle 
  • Place your heels about hip-width apart, toes turn slightly out 
  • With a neutral spine, fold forward and push the hips back, getting a good stretch in the hamstrings
  •  The knees will bend but try to keep the shins vertical 
  • The feet remain rooted and balanced with equal pressure through the big toe, little toe, and heel.
  • Once you reach the handle, stiffen the triceps to keep the arms straight and pull the shoulders down (not back) to properly engage the lats
  • Squeeze the glutes to extend the hips and the knees will naturally straighten out 
  • Stand tall with total body engagement, being mindful not to lean back and hyperextend 
  • Fold forward, push your hips back, and return the bell to the ground.
  • Keep your gaze on the horizon at all times. This will naturally have you looking slightly up at the bottom and straight ahead at the top

Step 2 – The Kettlebell Belly Hinge

Now that you’ve mastered the deadlift, the belly hinge will fine-tune your engagement of the posterior chain and improve your ability to engage the core.

Anatomically, the belly hinge looks almost identical to the deadlift (and the swing).  The difference lies in where and how you hold the kettlebell:

  • Grip the horns of the kettlebell handle (much like a goblet squat) and push the bottom of the bell into the top abdominal area
  • Inhale through the nose and brace the abs against the kettlebell
  • Hinge the hips as above

Think of the arms as performing an isometric row. The elbows actively drive back while the shoulders pull down with the lats.

Taken together, this core and upper back engagement keeps the spine in strong safe alignment.

Step 3 – The Drag Deadlift

Now we add horizontal movement with the drag deadlift.

The role of the lats in the swing cannot be overstated and this deadlift variation teaches you how to use the lats in order to control the kettlebell.

  • Stand at arm’s length away from your bell 
  • Hinge the hips, reach out to grab the handle, and tip the bell towards you 
  • Grip tight and drag the kettlebell towards you using just the lats 
  • Keep pulling until the bell reaches the original deadlift start position 
  • If you continue to really flex through the lats and triceps, the kettlebell might even float up off the ground 

Step 4 – The Kettlebell Hike Pass

Now we’ll add some ballistic intention (fast movement) with the hike pass.

The kettlebell hike pass is essentially the faster, flying version of the drag deadlift.

The goal here is to take the kettlebell from the ground to the backswing position (outer forearms connected to inner thighs).

  • Set up in the drag deadlift stance
  • Use the lats and triceps to pull the kettlebell off the floor and push it back past the groin
  • Stay in a deep hinge stance and be careful not to raise the hips
  • Allow the kettlebell to passively swing back to the starting position

The hike is how you’ll load the hips for the kettlebell swing.  It’s like pulling back the bow string before launching the arrow.

Getting a consistent hip hinge and hike pass is half the battle of nailing the perfect swing.

Step 5 – The “Yang” Plank

The top of every kettlebell swing includes a tall standing posture with the entire body locked out strong.

To dial in this feeling, we’re actually going to step away from the kettlebell for a minute and practice the yang plank.

  • Set the feet about hips width apart and hands close. This approximates the stance at the top of a kettlebell swing 
  • Drive the heels back, flex the quads, glutes, and abs tight 
  • Stiffen the triceps and pull the shoulders down to engage the lats 
  • Hold for 10-15 seconds

At this point you should be shaking from the tension but stay relaxed in your face.

This is what you want to feel at the top of every kettlebell swing!

Step 6 – The Dead-Stop Kettlebell Swing

Now that we’ve dialed in the hike pass and lockout, all that’s left is to extend the hips and launch the kettlebell.

We bring everything together with the dead stop kettlebell swing.

Basically you will perform a swing one rep at a time – returning the kettlebell to the ground between each rep.

  • Set up for the hike pass as above
  • Once the bell is high into the backswing, squeeze the glutes and stand straight up 
  • Brace the core and engage the quads by thinking about pulling your kneecaps up to the groin 
  • Allow the kettlebell to float anywhere between belly and chest height 
  • Keep the triceps engaged to maintain straight arms, but do not lift the kettlebell with the shoulders
  • As the bell falls, guide and push it back into the hips with the lats 
  • Use that lat and tricep strength to decelerate the bell and return it back to the ground 

Step 7 – Continuous 2-Hand Kettlebell Swings

Once you dial in the swing for single reps, you can start stringing them together for 5-10 reps at a time. 

Cyclical swings are performed with all the same basic techniques you’ve learned up to this point.

Instead of resting the kettlebell between each rep, simply continue the hip hinge and extension for the desired number of reps.

On your last swing, catch the kettlebell into the backswing to decelerate, park it, and rest.

Conclusion

Now you have a proven set of progressions and techniques to lean on in your quest for the perfect kettlebell swing.

Remember, consistency and proper form are key to reaping the full benefits that kettlebell swings have to offer. So practice them often.

Whether you’re looking to enhance your cardiovascular endurance, strengthen your muscles, or simply inject variety into your workouts, you now have the kettlebell swing in your arsenal. By incorporating the techniques, safety guidelines, and tips outlined in this guide, you’re on the path to achieving remarkable results and a stronger, more resilient you.

PS – If you want to take your kettlebell training to the next level, check out the Kettlebell Foundations online course.

PPS – Use coupon code “kb25” to get 25% off now through September 1st 😉

The Ultimate Guide to the Goblet Squat

The Goblet Squat is a simple yet powerful total-body exercise and is the best way to learn how to squat with a kettlebell.

In this article, we’re breaking down the kettlebell goblet squat, and how to perform it with proper form to develop hip mobility, leg strength, and total-body work capacity.

We’ll also take a look some other kettlebell squat variations using both single and double bells.

The goblet squat is an amazing exercise and has a place in every lifter’s workout program.

As a coach, among my most important jobs is teaching new lifters how to squat with strong, safe technique… and the goblet squat gets the job done with fast and consistent results.

The goblet squat was invented by legendary strength coach Dan John whose work and support has been instrumental in my development as a trainer.

Goblet Squat Muscles Worked

The cool thing about a goblet squat is that it’s truly a full-body exercise.

Like any squat movement, you’ll definitely hit the prime movers of the quads, glutes, and adductors (inner thigh muscles).

Additionally, because you have to hold and support the kettlebell with your upper body, the forearms, biceps, deltoids (shoulders), upper back, and core are fired up as well.

Before we grab a kettlebell and get to squatting, let’s cover two very important technique points.

Foot Placement for Goblet Squats

First, we’ll find your optimal foot position.

Every squat starts at the feet, so getting this right could mean the difference between feeling great while getting stronger vs. contending with sore knees and back pain.

Let this be known – there is no single best squat stance that applies to everyone.

Differences in anatomy, mobility, and strength mean that you’ll have to experiment to find what feels best for you and your body.

But I will show you what to look out for and the simple process I use to help students find what works.

Your foot position consists of two main parts – the width of your stance and the angle of turnout with the feet.

Stance width is pretty simple – just set your heels somewhere between 2 and 6 inches outside of hip width. You want just enough space for your hips and torso to fall between the knees.

To dial in the toe angle, I like to use this strategy from Brett Jones:

Stand on a hardwood floor with socks on. Your feet should be able to slide around with minimal friction. With the feet hips-width apart and pointed straight, squeeze the glutes as hard as you can, rock back slightly on the heels, and allow your feet turn out.

You may find that one foot turns out more or less than the other and this is completely normal.

Wherever your feet settle is probably going to be the best angle for your squats.

This is how we use hip structure to determine foot position. If it’s the other way around, we risk jamming up the hip, rounding the low back (aka “butt wink”), or simply reducing the range of motion of our squats.

In any case, be sure to make adjustments along the way and take note of what positions feel best and allow more range of motion.

The “Active Negative” Squat

This quick technique tweak will revolutionize how you squat!

Rather than simply yielding to gravity on the way down, you can supercharge every rep by actively pulling yourself down into the squat. You achieve this by engaging your abs and hip flexors to control the descent.

To get the hang of this technique, you can lie down on your back and have a partner grab the tops of your feet. Pull your knees into your chest as your partner gently resists. This mimics the squat pattern and forces you to achieve full range of motion by actively using your core and hip flexors.

This drill can also be performed by looping a resistance band over your feet.

Hold the deepest hips-flexed position you can for about 5 seconds while maintaining core tightness and a neutral spine.

By learning how to actively pull yourself into hip flexion, your squats will be stronger and safer, reducing hip pinching and low-back rounding.

How to Goblet Squat with Proper Form

With our foot stance and active negative technique dialed in, it’s time to squat!

  • Get the kettlebell into position with a power clean off the floor.
  • As the hips lock out, bend the elbows to guide the kettlebell up to chest-height. Quickly shift your grip from the top of the handle around to the horns.
  • Settle the bell with a tight grip, elbows point down, and hold a few inches away from the chest. Keep the legs, glutes, and core tight, shoulders down.
  • Simultaneously bend at the hips and knees.
  • Keep the chest up and remember to actively pull yourself down into your deepest comfortable range of motion.
  • Allow the elbows to slide just inside the knees. This should ensure your knees are tracking approximately with the middle toes.
  • Keep the spine long and straight at the bottom and double check your mid-foot balance – the big toe, pinky toe, and heel should all feel equally loaded.
  • Start the ascent with a grunt to pressurize the core and exhale through to the lockout.
  • Squeeze the glutes and finish tall.

The goblet squat is simple as that.

Goblet Squat Grip Options

I’ve been demonstrating the standard horn grip so far, but there are two other grips you can use for the goblet squat.

First is the “belly” hold.

Tip the kettlebell upside down and grasp around the side so the handle falls between your hands. This grip is particularly useful with competition kettlebells that have straighter horns.

The next grip splits the difference and has you holding the belly while hooking your thumbs through the inside of the horns.

The handle will tilt slightly downwards and rest against the top of the chest. Crush the kettlebell, squeeze the pecs and lats, and keep your elbows driving in towards each other.

5 Common Goblet Squat Mistakes

Simple though it may be, there are plenty of technique errors that creep up in the goblet squat. The good news is that these mistakes are often easy to fix!

Mistake #1 – Folding the torso forward onto the thighs.

This often happens because the lifter is afraid of allowing the knees to move forward and assumes it to be a sign of bad form.

Actually, the squat requires a deep bend in both the knees and the hips, and that means the knees will need to travel slightly forwards toward the toes.

This is perfectly natural and necessary to target the right muscle groups.

Mistake #2 – Excessive low back rounding.

This is typically caused by not staying tight enough on the descent or by squatting too deep. Remember to actively pull yourself down and there’s nothing wrong with squatting to parallel (hips in-line with knees) even if you have the flexibility to go lower.

Mistake #3 – Rounding the upper back.

Keep the shoulders pulled down and back for a proud chest. You can even think about pulling the kettlebell handle apart to maintain this tension. Of course, you could simply be using a weight that’s a little too heavy.

Mistake #4 – The hips shoot back on the ascent.

Engage the quads and really focus on leading with the upper back and shoulders on the way up. Again, this could also be due to using a heavy weight that’s a bit too heavy.

Mistake #5 – Losing foot rootedness and allowing the heels to rise.

If all of your other technique points are solid, this is likely due to tight ankles. Be sure to make ankle mobility a priority in your training and in the meantime, feel free to elevate your heels with squat shoes or stand on a weight plate or books.

Kettlebell Squat Variations

The cool thing about using kettlebells in the squat is all the variations it allows us to perform.

Let’s start by taking a look at two ways to work deep hip mobility in the bottom of the squat.

First is the prying kettlebell squat where you push the knees out with the elbows side to side to get a gentle stretch through the groin.

Next is adding a simple bicep curl. Be sure to maintain good posture and core stiffness.

Of course we can squat from the shoulder racked position as well. This requires strong kettlebell clean technique so be sure to check out that article if you haven’t already.

The single-racked kettlebell front squat, much like the single arm swing, develops core strength through its anti-rotation effect.

The double kettlebell front squat is a classic lift for building muscle and teaches you how to breathe under intense pressure and tension.

With any kettlebell front squat, be sure not to let the elbows flare out! Keep the shoulders packed down and really use your abs and breath to support the kettlebells.

Finally, here’s the bottoms-up kettlebell squat.

Holding the bell upside down requires tremendous grip, arm, and shoulder strength.

When we squat, we take the foundation out from under the grip, making the core, lats, and arms work even harder. This is a great technique for linking upper and lower body strength together through core stability.

In Conclusion

The Goblet Squat is one of the most useful and user-friendly exercises ever.

Rank beginners and hardcore lifting veterans alike will find a place in their training for the goblet squat.

Whether you’re warming up, working on hip flexibility, chasing a quad burn, or just building whole-body resiliency, the goblet squat gets the job done.

The Bulgarian Goat Bag Swing

This goofy sounding exercise could be the missing link in your kettlebell workouts.

Developing a strong, consistent hip hinge should be a top priority for new lifters.

The hinge is the key to unlocking your strength potential in any fitness or performance endeavor, not just kettlebell training.

A good hip hinge properly engages the hamstrings and glutes in big exercises like the deadlift and kettlebell swing (giving you more power) and it also protects your low back from the aches and pains that often creep in with those exercises.

Before diving into the ballistic kettlebell lifts (swings, cleans, snatches), a smart lifter will take plenty of time training with the slow lifts to ingrain the optimal hip hinge pattern.

The deadlift is the obvious place to start but there is another, often overlooked, progression that can help us get to hip hinge mastery…

The “Bulgarian Goat Bag Swing.

Like the goblet squat, this is another exercise invented and popularized by coach Dan John and the story goes that he gave this move a crazy name as an unofficial trademark of sorts to keep people from plagiarizing his ideas.

Now that I’ve given credit where credit is due, I will sometimes refer to this exercise simply as the belly hinge.

Bulgarian Goat Bag Swing Proper Form

The belly hinge looks much like the deadlift or kettlebell swing – the butt travels back, the knees bend slightly, feet stay rooted, and the spine remains neutral.

The obvious difference is how and where you hold the kettlebell which offers a few key training advantages.

You’ll grip the horns of the handle much like a goblet squat and push the bottom of the bell into the top abdominal area.

Inhale through the nose and brace the abs against the kettlebell.

As you hip hinge, think of the arms as performing an isometric row – the elbows are actively driving back while the shoulders are pulled down with the lats.

Taken together, this core and upper back engagement keeps the spine in strong alignment.

The goal with this and any hip hinge drill is to find that sweet spot where your hamstrings feel stretched while the feet remain rooted and balanced. Squeeze the glutes back into a strong lockout, being mindful to not to over-extend the hips.

You want to avoid folding – where the torso simply collapses forward without the simultaneous backward travel of the hips.

To that end, here are some more technical cues and variations to help you master the hinge.

Wall Tap Hip Hinge

The wall tap is a classic way to drill the hip hinge pattern. Simply take a small step away from a wall, feet at hips’ width, and push back until your butt makes contact with the wall.

Bench Block

To keep the hinge from turning into a squat, stand in front of a bench or step preventing the knees from shifting forward.

Dan John’sMagic Drill

Another gem from Dan John’s coaching toolbox is what he calls the Magic Drill.

Place a band around the legs, just over the knee line. Elevate your toes on small weight plates.

Perform the hinge as usual while pushing the knees out against the band. These two additions will really help you find your hamstrings and make it obvious when you’re folding the torso.

Kneeling Hip Hinge

Try out the tall kneeling hinge to simplify the technique or if you feel your low back fatiguing. By removing the need for ankle and knee control, you can really hone in on the feeling of hip extension and glute squeeze.

Narrow Stance Hip Hinge

Most kettlebell work keeps our feet at hip’s width or wider. I like to train in a variety of stances and the belly hinge allows us to do just that. See how your hinge feels with a more narrow stance, working all the way in to heels touching.

Single Leg Deadlift

This belly position can also be applied to create one of my favorite variations on the single leg deadlift.

Bottoms-Up Kettlebell Hinge

Finally, you can perform all of these drills in a higher position – by actually holding the kettlebell bottoms-up at chest height.

Try this position if your grip or low back fatigues.

What Size Kettlebell To Use?

If you’re a new kettlebell lifter or otherwise using the belly hinge as a warm-up, I’d suggest staying on the light side – 12 to 16 kg should be just fine for most people.

Of course, if you’re more experienced and maybe using this exercise as a substitute for the swing, feel free to go heavier but eventually your grip will become a limiting factor.

Bulgarian Goat Bag Swing Workout

Here’s a “fun” workout from Dan John – The Butt Blaster 5000.

You’ll perform 10 Bulgarian Goat Bag Swings followed by 10 Goblet Squats.

Then 9 reps of each, then 8 reps of each, and so on down to 1 rep of each without putting the bell down.

That’ll burn your biscuits.

In Conclusion

The Bulgarian Goat Bag Swing is a simple exercise but also a very powerful tool for mastering the hip hinge and progressing to the kettlebell swing.

That’s exactly why the Goat Bag Swing is featured in the Kettlebell Foundations training program.

Just a little practice guarantees your kettlebell swings will fly with more power while keeping your back strong and happy.