
“My squat is deeper than your emotions.”
There are dozens of squat variations worthy of your training time. But for maximal strength and muscle gain, one squat rules the roost – the barbell back squat.
The back squat allows you to handle the most weight possible. All else equal, you’ll lift more in your deadlifts and back squats than any other lift.
Listen up…
- If you’re a powerlifter or gravitate towards basic barbell training, you’ll always be tinkering and looking for an edge with your squat.
- If you’re looking to put on mass or get as overall strong as possible, the back squat will take you far.
- And if you just want to feel at home in any lifting gym, it pays to put in some practice with the back squat.
But there’s more to a strong squat than meets the eye. A lot more. If you want to squat more weight, for more reps, and stay safe in the process, the details matter.
Here are 4 of my top tips (and common mistakes to avoid) that will take anyone from squat dud to squat stud.
#1 – The Back Squat Set-up: How to “Become One” with the Barbell
The squat rep begins long before your hips and knees move. And even before the barbell touches your back.
The set-up is the first rep and a strong set-up begins with mentally committing to getting tight under the weight.
Even warm-ups will feel heavy and awkward after a rushed or sloppy set-up. But when you take the time to “become one with the bar,” you’ll experience unshakeable physical and mental confidence under any weight, even a new PR.
Here’s how to do it:
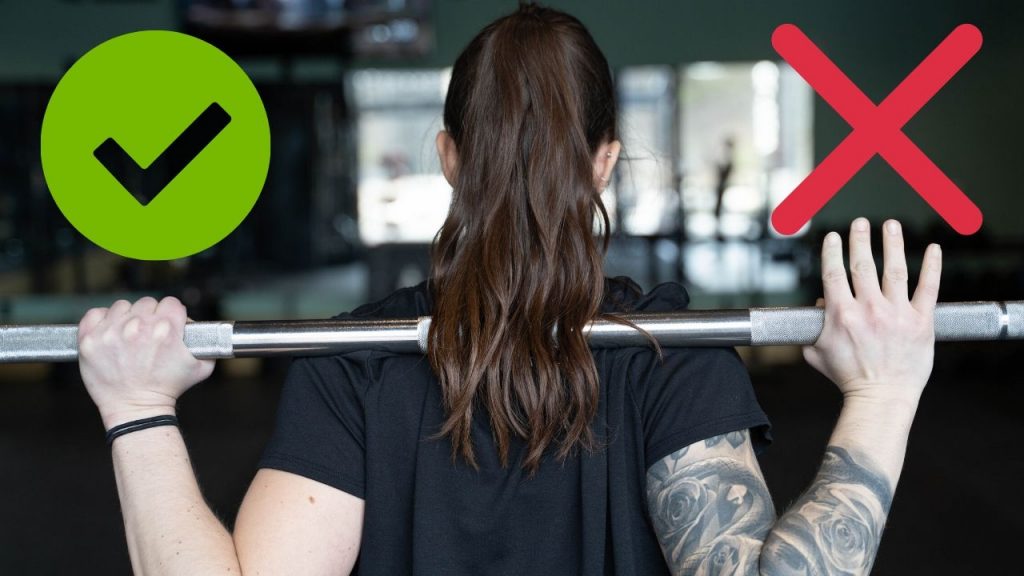
- Grip the bar at arm’s length, to a width as narrow as your shoulder mobility will allow. Tense the triceps and push the bar into the rack.
- Dip your head under the bar and pull yourself up by driving the elbows down and together.
- Wiggle around. Keeping a proud chest, shimmy side to side to get a bit more depth and lat/mid trap tightness. *This is assuming a low-bar position.
- Take a firm grasp on the bar. Think about “waving” the grip – tightening the fingers from the pinkies to the thumbs.
- Pull and push the bar. Think about pulling the bar into your upper back muscle shelf as you pull the elbows closer to each other. At the same time, push up into the bar by flexing the traps.
You’re working crazy hard and have barely moved. Ideally, you don’t even feel the bar itself – just upper back tightness and the feeling that you suddenly weigh a lot more.
You have become one with the bar.
# 2 – Beware Donald Duck Butt
There’s much hubbub about keeping neutral spine in the squat and deadlift. One of the big things many new lifters are taught to avoid is low back rounding or “butt wink” at the bottom of a squat.
In an effort to eliminate this lumbar rounding, many lifters overcorrect by (hyper) extending the low back and sticking the butt out.
Granted, some of us just want to show off our squat-sculpted hindquarters.
In any case, squatting with an over-arched low back is bad news. Let us count the ways:
- Excessive lumbar spine shear. Ouch.
- Ribs flare out, compromising core stability
- Hips shoot back (instead of down), reducing depth and causing hip impingement
Before descending into your squat, simply make sure you brace the core with a relatively neutral spine. Squeezing the glutes into a slight tail-tuck might help you find the sweet spot.
If you’ve taken the time to set up properly with the barbell (see point #1), this step should be pretty simple. A hard lumbar arch (anterior pelvic tilt) is often a natural reaction when the bar feels awkward or loose on the upper back.
I won’t list dozens of corrective exercises for “fixing” APT. Fancy accessories do little good when more focus could be dedicated to the lift technique itself. Just being kinesthetically aware and working on your bracing skills will go a long way. That said, here’s a nifty twist on a classic stretch that will help you find a stable neutral hip position:
#3 – Wake Up Your Sleepy Feet
The way I see it, all exercises done while standing – from sprints to swings to squats – are foot exercises first. No matter how or what you’re lifting, the kinetic chain starts with the feet.
Many of us struggle to get 10k steps in every day. And when we do, we’re often in cushy sneakers or binding dress shoes on hard, flat ground.
All this to say, our feet are generally in poor shape and rarely do we consider their role in lifting. But if you want to maximize your squat, it starts and ends with the feet.
Our Smart Squat Feet Strategy™ will consist of two parts: using an “active” foot and tripod balance.
The active foot is characterized by a strong arch and toes that grip the ground. As a person born with flat feet, I’ve struggled a lot here. Developing awareness and control of the deep foot muscles will take some practice, but will give you the performance edge few lifters have the patience to seek.
Let’s start by inviting the toes to this party.
These drills will help you get in touch with your toe control. Focus on widening the toes and creating as much space as possible. A big base is a stable base. Next, maximize tension at each end range – lift as high as possible and push down hard but without curling the toes.
When you get the wave just right, you should feel a “suction cup” effect. All the toes are gripping the ground, setting us up for the next step.
(Find more foot and ankle mobility routines in the Pistol Squat Playbook)
Now we flex the arches.
Try to pull the ball of the foot back towards the heel. You’ll feel tightness along the arch and should notice a slight raise even with otherwise flat feet.
If you need a visual, imagine standing over a thumbtack just to the inside of the arch. Collapse and get stuck!
Maintaining an active foot in the squat gives you the stability to fully express your leg strength while preventing ankle collapse that leads to all sorts of knee, hip, and back issues.
Now that our feet are dialed in, we just have to maintain balance on them.
The heel and base of the big toe and pinky should be evenly loaded at every stage of the squat. This is tripod balance.
Once you’re ready to begin your squat, double-check how you are balanced on your feet. Often, we are biased towards standing on the heels with little sense of rootedness through the toes and arches. Ideally, we addressed most of that with our active foot practice, but otherwise, simply lean forward until you feel equally balanced on the three points of contact.
If you suddenly feel much less pressure through your knees and hips, you’ve hit the sweet spot.
It can be easy to lose this balance and revert back to the heels, especially when driving out of the bottom. Starting with your warm-up reps, move slow and check how you’re loaded at each stage – standing, descending, in the hole, and ascending.
Many lifters are explicitly coached to squat from the heels with a hips-back emphasis. This probably comes from geared powerlifting technique, but for raw lifters looking to maximize depth and strength, a hips-straight-down approach with tripod balance is the key.
#4 – Unrack & Rerack The Barbell Like a Professional
How you start and end a back squat is just as important as the steps in between.
We’ve already covered how to set-up under the barbell, but there are a few more important points to consider before the first rep.
First, make sure your bar is evenly loaded on both sides. It sounds basic (and it is), but misloads happen all the time. Count your plates and consider it part of your setup.
Setting the bar too high on the rack is an all-too-common mistake. Not only does this make a strong setup virtually impossible, but you are forced to perform a calf raise just to get the bar off, and back on, the hooks. The bar should be set to a height that’s low enough to get a good wedge and allows you to easily clear the hooks when standing – a couple of inches below the collar bone line assuming a low-bar position. If the rack height increments don’t give you a sweet spot, err on the lower setting.
Another quick tip on using the rack – always set up so that you step back on the unrack and step forward on the rerack. Walking backward to find the pins after a hard set is not a good idea.
The final points on the unrack checklist are to find and settle into your stance. You’ve taken the time to get a rock-solid setup, so let’s not waste it by taking the bar for a long walk.
- Set up and “squat” the bar off the hooks. This should more or less look like your squat stance (not a lunge).
- Take one step back with either foot and match it with the other.
- Adjust your stance/feet as needed.
- Settle. Take a few seconds to establish tripod balance, breathe, and brace before your first rep.
When your set is done, don’t rush back to the rack. Hit the last rep, hold the lockout, and settle the bar as above. Because you only took one small step back, you’ll only need one step forward to rerack. I like to cue one big step forward (ending in a split stance) to rerack but this only works if the hooks are sufficiently low and the distance short. Otherwise, step in with both feet and reverse the unrack sequence.
How To Back Squat More
More weight. More reps. More like a pro.
A big back squat is your ticket to old-school strength. Remain a humble student of the squat, practice these cues and techniques, and you’ll enjoy all the gains you can handle.
Free eCourse: Powerlifting 101
Powerlifting is a strength sport for the people. While accessible to nearly everyone, the techniques and rules can be very particular.
If you’re a strength enthusiast and looking to dip your toe in the waters of competition (or just want to get stronger), this is for you!