I cut my teeth as a young trainer in the hustle and bustle of a big commercial gym, grinding through long hours on “split shifts” (early mornings and late afternoons).
Those hours were often packed with 30-minute sessions where I was expected to lead clients through effective total-body workouts.
Few of my clients came in with any experience in strength training and had only the bare minimum amount of time, energy, and attention to invest into their workouts.
Dealing with constant distraction from cell phones and exhaustion from work was the norm.
All this to say, wasting time on boring or complicated exercises was completely out of the question.
When the clock is ticking, efficiency rules.
A big mistake I see from my fellow strength coaches is taking on a new student and “cueing them to death,” nitpicking every detail to the point where the trainee barely gets to move.
The coach gets to flex his expertise while the lifter remains cold and confused.
In my opinion, this is an unhealthy dynamic and undermines the teamwork aspect of the coaching relationship.
As Dan John would put it, “don’t make me look stupid!”
I like to have clients train themselves as much as possible. By setting up a few creative constraints and letting them explore new techniques in a safe environment, people discover for themselves how to move, what works, and what doesn’t.
With just a little feedback from the coach, this breeds confidence and leads to new insights.
With that preamble out of the way, here’s how I might put this into practice while teaching one of the more complex kettlebell exercises – the Turkish Get Up.
The TGU is one of my favorite exercises that builds core and shoulder strength like none other.
The only problem?
Right from the start, many folks feel like a drunken turtle stuck on his back.
Add a big wobbly kettlebell overhead and we have a recipe for disaster.
Therefore, it’s my job to smooth out the learning curve and build little wins… all while keeping the trainee engaged and moving safely.
Here are a few strategies:
Use An Anchor
The unloaded arm and lat help to pull your torso diagonally off the floor.
Only problem?
There’s nothing to pull on!
Of course, we can cue the lifter to drive the elbow down into the floor, but that’s rarely enough to break inertia.
A simple solution: use a kettlebell as an anchor to pull against.
Tip a heavy bell on its side so the handle stands vertical on the ground and in-line with the bottom arm
Grab the handle and apply a gentle “stab” force down into the ground
Keep the forearm grounded and pull with the lats to assist the roll up
Once the lifter has popped up to the elbow, he can let go of the anchor and continue the rep.
This is a prime example of how an external cue can help develop internal pattern of tension.
Move That Booty
The upper body pulls the torso into the roll-up, while the lower body pushes. Indeed, the contralateral (opposite side) hip and shoulder, or rater – the glute and lat, work together to pop us off the floor.
Often, we are so focused on the kettlebell and loaded arm that we forget to use the hips to drive movement.
A simple way to get the glutes in the game is to perform “mini bridges” with the posted leg:
From the lying position, drive the planted foot down into the ground
Squeeze the same-side glute to perform a single-leg bridge
Pivot the hip so it moves diagonally up and across (not straight up)
Keep the other leg long with slight tension through the quads
Roll up to the forearm and repeat (keep space between the downside ear and shoulder)
Post up to the seated position and repeat (this is the traditional “high-bridge” technique)
Incorporating movement into otherwise static postures not only builds comfort with the get up, but also helps the lifter find new strategies to move through the steps.
Use These Bodyweight Core Exercises
We’ve covered upper and lower body specific drills.
Now we’re going to knit these two halves together with a few of my favorite core exercises.
The get up requires a combination of cross-body (opposite hip/shoulder) coordination, core strength, and shoulder stability.
Sure, the TGU develops these qualities, but you can supercharge your efforts by adding these bodyweight exercises into your training:
Dead Bug
Lie on your back with knees tucked in and hands reaching skyward
Extend the opposite arm and leg out to touch the floor
Maintain core engagement and deep breathing
The knees and elbows may bend to shorten the range of motion
Cross-Body March
Stand tall with arms overhead
Raise one knee and tap it with the opposite hand
Root through the standing leg
Pause and press hard against the leg to create extra core and lat engagement
Bear Crawl
From all-fours, take small steps by moving the opposite hand and foot in tandem
Keep the knees close to the ground and back flat
Add a knee tap (as described in the march) between each step
Crawl from the knees if the shoulders/wrists get jammed up
Move forward and backward
Perform each of these exercises for time, 60-90 seconds, moving slow and smooth at your own pace.
As you can see, the main goal with these ideas is to teach the subtleties of the Turkish Get Up without resorting to excessive cueing and boring monologues.
Instead, we encourage exploration of the Get Up with new, user-friendly movements.
Put this concept to use in your own training or coaching approach watch how a little play can go a long way.
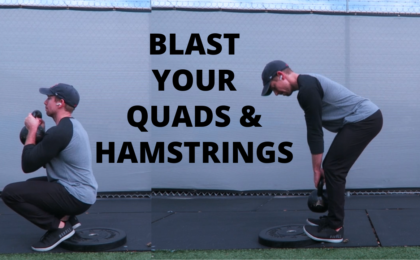
The deadlift and all its variations develop strength in the posterior chain (glutes, hamstrings, back, and lats), and when performed on one leg, we stack up new levels of balance and athleticism without the need for complex agility drills. Keep reading to learn how to single-leg deadlift with proper form and some of my favorite SLDL progressions.
Want to follow along with the video version of this article?
Just push play!
I’m adamant about programming single-leg exercises, specifically the single-leg deadlift, for all my clients – from competitive powerlifters to fitness newbies.
Why?
Three reasons.
First – much of life happens on one leg.
(The fact that I’m writing this article just days after a skiing accident put my right foot in a cast makes me lol)
From climbing stairs to kicking soccer balls, your ability to control and express strength through one leg at a time is a key physical skill.
The single-leg deadlift is a great place to start.
Second – single-leg work will make your big lifts bigger.
Let me explain.
Traditional bilateral moves that use both legs equally (like barbell squats and deadlifts) are great for building absolute strength with heavy weights…
But they can easily hide underlying stability issues.
Subtract a limb, and true movement control is revealed.
Single-leg exercises allow you to find and fill those gaps in stability, mobility, and proprioception that could be holding you back from big gains.
With the deadlift, you want the hamstrings to fire equally, the hips to remain square, and the back to stay neutral.
Small asymmetries can grow into real problems down the line if not addressed.
When you make each side stronger independently, they’ll crush it when brought back together. Teamwork makes the dream work.
Third – single-leg exercises deliver a real metabolic hit to boost fat loss and work the lungs.
Single-leg deadlifts are just plain hard and inefficient. When your whole body is forced to work and coordinate to the max on every rep, time under tension increases, more calories are burned, and the heart rate spikes.
What is the single-leg deadlift?
The SLDL is a hip-hinge exercise, meaning the goal is to flex at the hips, push the butt back, and then extend the hips forward back to neutral.
It’s in the same family as the traditional deadlift, kettlebell swing, and hip thrust. With all these exercises, your goal is to move the torso around the fulcrum of the hip joint, not by bending the spine or squatting down with excessive knee bend.
As the name suggests, you’ll perform the hip hinge pattern on one leg while the other leg stays in strong hip extension the whole time. In other words – keep the floating leg straight and locked out, more or less in line with the spine.
Like most hip-hinge exercises, the single-leg deadlift targets the big muscles of the posterior chain – the hamstrings, glutes, and erectors. Because you’ll be standing on one leg, the calves and quads will also work extra hard to stabilize the knee.
When using weight, the SLDL can be performed in two general ways:
“Romanian deadlift” style (RDL) where the weight stays floating during the set.
Or the traditional dead-stop style where the weight rests momentarily on the floor between each rep.
Each version offers unique benefits.
The RDL version keeps the muscles under constant tension to support muscle building and endurance. The dead-stop SLDL is great for building “off the floor” strength and can generally be loaded heavier.
Single-leg deadlift vs. traditional deadlift
When loaded up with heavy weight, the traditional barbell deadlift is the king of the posterior-chain lifts.
Alas, heavy deadlifts aren’t appropriate for everybody all the time.
We’ve already covered many of the unique benefits the single-leg deadlift has to offer, but it bears repeating – the SLDL can fill the movement gaps created or exacerbated by traditional deadlifts and squats.
The SLDL really shines for those of us working out at home with minimal equipment and is highly effective with just a couple kettlebells or dumbbells. Plus, the bodyweight-only version can be quite challenging as well.
Bottom line – the traditional deadlift is your go-to for building maximal strength while the single-leg deadlift can serve as a top accessory exercise or even the primary hip-hinge exercise for minimalist trainees.
In either case, the SLDL represents a must-do pattern. Lucky for us, there are many variations of the SLDL so we can usually find options that are valuable for lifters of any skill level.
How to single-leg deadlift with proper form
To ensure you’re ready to safely tackle the SLDL, let’s hit a quick clearing test.
Simply stand on one leg and bring the opposite knee up as high as you can.
Really root through the foot and grip the ground with your toes. Don’t slouch on your hip joint but rather engage the quads, glutes, and abs to maintain a tall posture.
Keep the knee as high as you can without over-arching the back or tucking the tailbone.
When you can hold this position and intension for 10 seconds each side, you’re ready for for the SLDL!
Let’s start with the slider SLDL:
(You can do these in socks or use a Val Slide, furniture slider, or paper plate)
Post up on the tip toes of the unloaded leg and slide the foot back with stiff quads. Slowly increase the reach while staying balanced on the front foot.
When you feel a good hamstring stretch or you’re close to losing balance, squeeze the glutes and slide the leg forward back to standing.
Once you’re confident with the range of motion, you can slide the foot back, pause, raise the leg up in line with the spine, and stand.
For the next two drills, we’re going to use a foam roller to help you find stability and balance.
Stand a roller up vertically next to the floating leg and place the nearest hand on top, using it as a balance aid. Again, push the hips back and drive the back leg strong and straight.
As balance improves, move the roller farther away and apply less and less pressure until you’re barely balancing with one finger.
Now let’s use the roller to help create core stability and linkage between the upper body and lower body.
Place one end of the roller on the top of the floating foot. Palm the other end with the same side arm, keeping both limbs locked straight.
Start with a little kick forward before sweeping the leg back. Maintain light to moderate pressure through the roller to really challenge the full-body linkage. Sweep the leg forward and repeat.
Now for our first variation without assistance!
Clasp your hands behind your back, really pull the shoulders down and make a proud chest. Sweep the leg forward and back as before.
The second option here is to reach the arms long and forward while keeping the shoulders and hips squared off.
By this point, you should have a firm grasp on how to root through the floor, load the hamstrings, and keep the floating leg active which means we can begin to add extra load in the hands.
Start by holding a kettlebell or weight plate on the chest and perform the SLDL as usual.
For the sake of safety and stability, I like to reestablish ground contact with the floating foot on each rep. To help really engage the lats, you can move the weight down towards the bellybutton during the hip hinge, essentially creating an isometric row.
By starting with the weight held high around the upper body, you’re learning how to keep the core engaged and torso square which are important to keep in mind as we move to heavier weights with straight arms.
Now we’ll take a look at the most commonly seen variation – the contralateral single-leg RDL. Contralateral simply means the opposite arm and leg are loaded, so if you’re standing on the left foot, the weight is held in the right hand.
Begin by standing with both feet on the ground. Hold a dumbbell or kettlebell close by the floating leg. As the leg moves back, simply fill the space with the loaded arm.
Hinge back until your hand is somewhere around or just below the knee. Pause for a second, squeeze, and stand up.
Another variation to really wind up the hip is to push the weight across the midline towards the standing foot. This doesn’t mean to go deeper, just add a subtle inside turn with the hip and torso.
Here’s a bonus exercise to really challenge your stability in that hip hinge position – at your deepest range of motion or a bit higher, maintain your alignment and balance as you pass the kettlebell from one hand to the other. Try 3-5 passes each side and stand.
The next option is the traditional deadlift where the weight is lifted and returned to the ground on every rep. This one’s a bit more challenging because you’ll have to establish your single leg balance before lifting the weight.
Line up the weight just to the inside of your standing foot so you’ll be reaching straight down for it, not out and away. Perform the eccentric portion of the SLDL as usual, grab the handle, and slowly squeeze the weight off the floor.
Pause here for a few seconds to really own this bottom position and stay tight. Slowly stand up, and at the top, kickstand the leg to find balance and rest momentarily.
Keep the lats tight on the negative to prevent the weight from falling forward. Maintain full-body tightness and repeat the rep from a dead stop.
One big caveat here – we don’t want to sacrifice neutral spine or lat engagement just to grab the weight. It’s a long way to reach, especially if you’re tall or using dumbbells. I suggest elevating the weight on a block or plates as much as needed to maintain control and alignment.
Of course, the single-leg deadlift can be performed with weights in both hands and even with a barbell or land mine. There are dozens of ways to do the SLDL but these progressions will bring you up to speed and cover most of your bases.
How to program the single-leg deadlift
I’ll typically program the SLDL for 2-3 sets of 5-10 reps per side.
When performed slow and controlled, 10 reps is a lot of time under tension, so don’t worry about adding a bunch of reps or weight when you start out – simply practice and strive to master the movement pattern.
Your SLDL variations can be incorporated into your warm-up to prime your nervous system and muscles of the posterior chain or performed as an assistance exercise after your main compound lifts like squats and deadlifts.
Of course, if you’re working with limited equipment, the SLDL could be your main strength lift in a training session and really loaded heavy once you have some practice.
The top 3 common single-leg deadlift mistakes
To wrap up, let’s take a look at a few pro-tips and common mistakes to avoid.
First, try to lift in barefeet or thin-soled shoes as much as possible. You always want a solid ground connection with any squat or deadlift exercise, but it’s especailly important when you’re on one foot.
Second, when you’re using weight, don’t settle for a loose grip.
Really tighten up on the handle or barbell, stiffen the triceps, squeeze your lats and pull the shoulder down. This tension through the arm and upper back will help you control the weight and maintain proper alignment.
The most common mistake I see is the hips shifting up and out, essentially turning the rep into a sloppy version of a hip airplane. Really fight to keep the shoulders and hips square to the ground and keep the floating big toe pointing straight down.
This is often combined with what I call “Tippy Hips.”
Many people think that a “balance” exercise requires a straight standing leg, but that’s certainly not the case because you’re just teeter-tottering on the hip without using any actual muscular engagement.
Remember – it’s a hip hinge, so bending the knee allows us to push the hips back while maintaining mid-foot balance. Otherwise, it’s just a forward fold hamstring stretch.
Finally, please do not bend like a cheap fishing pole during this exercise. Keep the lats and core tight to brace the torso and fight for height on the back heel with glute and quad engagement – not simply arching the low back.
And remember, don’t let range of motion sacrifice your alignment and muscular engagement! Don’t go bending over with the spine just to reach the floor. Everybody’s hip mobility and hinge angles are different so respect where you’re at and train smart.
The single-leg deadlift, in all its forms, trains the posterior chain muscles and full-body coordination.
For heavy lifting types, the SLDL is a valuable accessory lift that will help highlight and correct movement issues that could be sabotaging your technique and strength progress.
For those training at home or with minimal equipment, the SLDL is a fantastic choice for working the hip-hinge pattern without the need for heavy weights.
Take the cues and progressions from this article and start practicing. After just a few workouts, you’ll no doubt notice a boost in your ability to balance and engage the glutes and hamstrings.
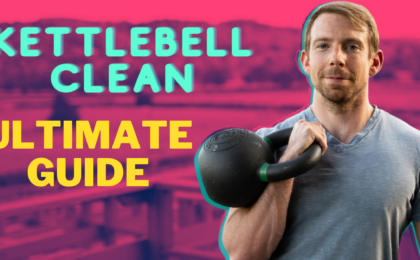
The kettlebell clean is a powerful full-body exercise that is notoriously difficult to learn. In this article, you’ll learn a fool-proof, step-by-step process to performing the kettlebell clean without banging up your forearms!
To some lifters, the clean is little more than the annoying step before a press. But to the real strength technician, the clean is a fundamental and valuable lift in its own right.
The kettlebell clean looks like a simple exercise, and it really is, but there are plenty of details to nail down before doing one safely and effectively.
Most kettlebellers have a hard time with the clean – often suffering bruised forearms, torn hands, and sore low backs from wrangling with an unforgiving kettlebell.
I’ll admit, the clean was by far the hardest exercise for me to learn when I first got into kettlebell training.
It’s tricky to coach too because, much like the swing, it’s a fast, ballistic exercise – you don’t have the luxury of slowing it down and picking it apart during the actual lift.
The learning sequence must be dialed in step-by-step in an order that allows you to safely practice the fundamental techniques and then combine those techniques so your clean comes together smoothly with minimal chance of injury.
In other words, so you can do a clean clean.
The purpose of the clean is to get the kettlebell into a secure rack position where it can then be pressed overhead or held in place for front squats and carries. A good clean is absolutely mandatory for a strong and safe military press – many presses fail not from a lack of pressing strength, but from a sloppy clean.
Plus, the clean itself is a wonderful lift – offering all the benefits of a swing with the added challenge of stopping and stabilizing the kettlebell with your upper body and core.
The kettlebell clean is where ballistic power meets isometric tension.
Prefer to follow along on video?
Just push play:
Let’s address 2 quick pre-requisite skills before jumping into the clean itself.
First, I recommend you have solid 1-arm swing strength and technique.
The hips power the weight in the clean… it’s not a bicep curl. Be sure you can comfortably swing your target clean weight (or heavier) up to chest height for 10 reps.
Second – get skilled with the bottoms-up clean.
The most important part of the clean is the ability to guide the kettlebell vertically while decelerating the momentum enough to have it land smoothly in the rack position.
The bottoms-up clean, done with a sufficiently light enough weight, allows you to practice the “zip up” technique without changing grips or worrying about the bell crashing into your arm.
Once we have those two skills in place, all we have to do is get familiar with the rack position and the nuances of switching between the “swing grip” (where the handle is held by the fingers) and the “clean grip” (where the handle rests deeper into the palm).
Let’s take a cue from Stephen Covey and The 7 Habits of Highly Effective People, and begin with the end in mind.
The Kettlebell Rack Position
The clean ends with the kettlebell in the rack position, so that’s where we’ll start.
Using two hands, “cheat clean” the kettlebell and nestle it like an iron dinosaur egg in the cradle of muscle formed by your bicep, delt, pec, and forearm.
Stand tall with your glutes and abs braced. Your lat and tricep should be squeezed and flexing into each other, forming a single “super muscle.” Keep the elbow down and forearm somewhat vertical. Don’t flare the arms. Instead, think about absorbing the weight into your entire body.
Using your other hand, move the bell around until you find a comfortable angle. The handle may be oriented more parallel to the knuckles in the center of the hand if you need to grip tight for strict presses or set at a deeper diagonal angle from the thumb webbing to the pinky-side heel of the palm.
Do not let the kettlebell put you in a wrist lock. Racking or pressing with a bent wrist is by far the most common kettlebell mistake I see.
Keep the wrist completely straight or even slightly goose-necked.
With your rack position and body posture in place, take a mental note of how everything feels. You’ll attempt to recreate this feeling at the top of every clean rep.
Again – keep a tall posture supported by tight glutes and abs, the lats support the shoulder and arm, and the kettlebell is nestled in the muscle cradle.
The Clean Drop
Remember, we are working backward here so the next step to practice is the clean drop. The drop is where we release the bell from the rack and load it into the backswing, all while shifting our grip on the handle from the palm to the fingers.
Open your hand and guide the bell down the midline of the torso like you’re unzipping your jacket. Resist the urge to cast the bell away from you. Instead, keep the elbow squeezed into your side as if the lat and tricep are velcro’d together.
Remain standing tall until the handle falls below the bellybutton, at which point you can begin to hinge the hips and actively push the kettlebell into the backswing.
Until this point, the bell is in a controlled free-fall. Because you opened your hand at the top, you can now slide and re-grip the bell with the fingers in the same style you use for swings.
Don’t let the kettlebell yank you down into a squat. Really force the momentum backward in order to load the hamstrings.
From there, allow the arm to swing forward and set the bell down. Cheat clean the bell again and repeat this drill until you can quickly establish a strong rack position and smoothly drop into the backswing without pinching your calluses.
At this point, most of the hard work is done.
Once you’re familiar with the nuances of the rack, how to shift your grip, and how to load up the hamstrings, the rest of the clean will easily fall into place.
The Kettlebell Power Clean
To train the ability to quickly adopt the rack position without assistance from the free hand, we’ll do a power clean straight up from the ground.
Stand directly over the kettlebell or even slightly in front. Load the hip hinge as if for a deadlift. Quickly extend your hips and stand up straight, keeping the elbow close while guiding the bell into the rack. Drop the bell into the backswing as before and park it.
You’ll want to use a slightly lighter bell for this drill as you won’t quite be able to take full advantage of your hip power (when compared to the full backswing version coming next).
You can also elevate the bell to shorten the range of motion and prevent the need to squat in order to reach the handle.
The Full Kettlebell Clean
Now we’re ready for the full proper clean. And because we’ve been working backward, the only step left to incorporate is the hike pass.
Of course, because you’re already practiced at the 1-arm swing, this is old hat. Indeed, the backswing into hip extension is all performed exactly the same as in the kettlebell swing.
When the hips snap forward, simply keep your elbow glued to your side, “zip up your jacket,” and guide the bell into the rack.
Congrats – you just did a full clean!
To start off, I recommend practicing cleans in between reps of swings. There’s a common tendency to slack off on hip extension power when cleaning. By performing 1-3 swings in between every clean rep, you’ll train your hips to stay consistently snappy.
Double Kettlebell Cleans
Let’s wrap up with a few quick notes on the double clean and your grip options.
The same learning sequence can be used for the double bell clean – starting with rack holds, then drops, power cleans from the floor, and finally from the hike pass and swing.
Using two kettlebells will necessitate a slightly wider stance and by extension, your hip hinge range of motion might be a bit shorter. Other than that, all technique points remain the same. Many folks report cleaning two bells is actually easier than one because of the balanced load.
Your grip orientation during the drop and backswing will influence how the bell rotates around the hand to land in the rack.
You have 4 basic grip options – Pistol grip with handles parallel, “10 & 2” with handles at 45 degrees pointing away, barbell grip with handles in line with each other, and the “V” grip with handles at 45 degrees pointing towards you.
Each style has pros and cons and their suitability will depend on your build and general preference. I encourage you to experiment to find what feels strongest to you while keeping in mind that different techniques may be more or less appropriate as you move through bell sizes.
All that said, I generally recommend folks start out with the “10 & 2” grip as that seems to allow for the most consistent lat engagement through the entire rep.
How to Breathe in the Clean
One last technique tip – if you’re familiar with the hardstyle swing, you know how to power breathe to put some extra power on the hip snap. The same breathing pattern can be applied to the clean as well – inhaling through the nose during the backswing and exhaling forcefully with the hip extension.
A common mistake I see, even among kettlebell coaches and enthusiasts, is holding the breath too long and exhaling when the kettlebell lands in the rack. You’ll see this a lot in the snatch as well where the exhalation is timed with the landing of the bell as opposed to the snap of the hip. So just keep that point in mind –
To use the power breath effectively, time it with the hip!
Kettlebell Clean Workout
And finally, here’s a fun sequence to practice your cleans while getting a great total-body strength workout:
Clean + Press double kettlebells for 3 reps.
Clean + Squat for 3 reps.
Repeat for 2 reps each.
Repeat for 1 rep each.
That gives you a total of 12 cleans, 6 presses, and 6 squats. Try it for 3 rounds, resting 2 minutes between rounds.
So there you have it. The kettlebell clean is a tricky lift, but well worth the time to learn. And once you do, you’ll unlock a whole new level of possibilities for your kettlebell training.
The Get Zacked series is a collection of my favorite bodybuilding-inspired tips and techniques to build muscle, get an epic pump, and increase the almighty mind-muscle connection.
Today’s exercise is gonna burn.
We’re hitting the hamstrings and quads hard with a simple time-based combo.
Broadly speaking, lower body exercises can be categorized as either
Squat dominant – where the movement emphasis is on maximal knee and hip bend, targeting the quads
Hinge dominant – where the movement emphasis is on maximal hip bend and minimal knee bend, targeting the hamstrings
Of course, there is some overlap – movements fit more on spectrums than inside rigid boxes. But knowing (and feeling) the difference between the two patterns is a key lifting skill.
This sequence is going to have you working through both the squat and the hinge back-to-back with your heels elevated for an added challenge.
Your hamstrings and quads are about to get tenderized…
Here’s how:
Start a timer for 3 minutes. Maybe just 2 on your first time…
Grab a kettlebell (or hold a vertical dumbbell) weighing around 1/3 of your bodyweight
Elevate your heels on a weight plate, 2×4, or your collection of Hemingway and hymnals as demonstrated in the video
Begin deadlifting with long, straight arms. Touching the ground on every rep isn’t necessary – just get good hamstring engagement
Once your hamstrings really start to fatigue, simply drop the hips into a squat, shifting emphasis to the quads
Really get deep on the squats, allowing the knees to travel forward over the toes
Shift back into the deadlifts when you can’t stand the quad burn
Don’t stop moving till time runs out
Experiment with stance, toe angles, and tempo of the lifts.
You can also try elevating the toes on the deadlift and switch to the heels on the squat.
Try this as a finisher on any lower body training day.
Tracy Cook in the “Strength Kitchen” – Savannah, GA
If there is one clear winner from 2020 – it’s the home gym market.
In fact, dumbbells and kettlebells seem only just behind toilet paper and hand sanitizer in terms of consumer demand.
As a kettlebell lifter, I’ve been a fan of working out at home for years.
While I love to bro-out up and down aisles of machines in commercial gyms, I also know how to get a world-class workout with just my own body and a few simple tools.
But training at home isn’t just for fitness fanatics like me.
I recommend a basic home gym setup for all my clients.
Even before the pandemic, going to the gym was a hassle… Traffic, jockeying for equipment, rushing for work or dinner, taking weird looks as you do your mobility routine…
They can all add up to major roadblocks to your success.
Your progress hinges on consistency and that means reducing barriers as much as possible.
Having the option to workout in the comfort of your own home, on your own schedule, is an obvious asset for anyone prioritizing fitness in their life.
Your home gym could range from a simple “courage corner” of a mat and a few kettlebells, to a fully stocked 2-car garage with racks and barbells, and anything in between.
I’ve been helping clients all year to outfit their homes with the right gear for their needs and budget and I’d like to do the same for you here.
What follows is a not-so-short list of at-home workout equipment I use personally and recommend to clients. I’ve included some context on the benefits of each piece so you can make an informed buying decision.
* Assume that every link is an affiliate link, meaning I’ll receive some amount of commission on sales.
Kettlebells
Surprise! 😉
Seriously, nothing beats a kettlebell or two for getting a stellar minimalist workout. If you want one small, nearly indestructible tool to cover most of your strength, cardio, and mobility needs, look no further.
Bands super portable, weigh almost nothing, and have a wide range of uses.
Band pull-aparts and dislocatesare staples for shoulder mobility and rotator cuff strength. Loop under your feet for bicep curls and over a bar for tricep extensions. The x-band walk and banded RDLs are my favorite lower body drills and heavier bands are useful for assisted pull-ups.
The most recent addition to my home training arsenal is the decidedly old-school pec stick.
It’s a simple design of a heavy duty spring with handles on either side. You bend it and… that’s really it.
Sure, the pec stick is a one-trick pony, but it’s a pretty good trick.
Pectoral work isn’t just important for aesthetics or muscle growth- the pecs play an important role in shoulder health and all pressing exercises.
The pecs are notoriously difficult to isolate – even in exercises like push-ups and dumbbell flys, the delts and traps often take over. The stick all but forces pec activation without the need for weights or even special cueing and coaching.
The isometric nature of the stick squeeze can also be used to amp up core engagement in other simple exercises like squats and dead bugs.
Dumbbells are obviously a great addition to a home gym. They are beginner-friendly and just about everybody knows a few basic lifts.
While a full set could easily include 20 or more dumbbells (pairs of 5 through 50 lbs), you’ll get the most use out of a light pair (for arm/shoulder work), a moderate bell (for rows and presses), and a heavy pair (for squats and RDLs).
This might translate to a pair of 10 – 20 lbs, a 35 lb, and a pair of 50 lbs.
There’s really no substitute for pull-up bar work. Even if pull-ups aren’t in your wheelhouse, bar hangs, scap pulls, leg raises and various other drills are great for shoulder health and back and core strength.
Door jam pull-up bars might seem dicey at first, but I’ve never had or seen a problem with them. Just be sure the fit is secure and consider wrapping a hand towel around the arms to minimize scuffing up your door frame.
When worn around the thighs, ankles, or feet, mini bands will help target the glutes during lower body moves like squats and lateral walks. These make for effective activation/warm-up drills and really intensify weighted squats.
Mark Bell’s Hip Circle is the most comfortable option for this lower body work and is my top recommendation for powerlifters and heavy squatters.
Much like their full-length brothers, mini bands are great for training the rotator cuffs with various pressing and pull-apart drills.
If absolute strength is your goal, the barbell is your weapon of choice.
Of course, you’ll need a rack and bench to maximize the use of a barbell, but deadlifts, rows, cleans and presses are big money lifts that require no extra gear.
Unless you have a deadlift platform or are a strength athlete, opt for bumper plates. Trap or Hex bar deadlifts tend to be easier on the back making them a good choice for new lifters, young athletes, or those with cranky low backs.
Parallettes aren’t just for gymnastic feats of strength. The basic parallel bar dip lockout and L-sit or tuck holds are excellent arm and core exercises for the intermediate lifter. They can be used as stands for low incline push-ups.
Skipping rope is the ultimate low-tech choice for athletic conditioning. The cardio endurance benefits are obvious, but you’ll also build resilient feet and calves alongside body rhythm and coordination.
Grip and forearm strength is an often overlooked component of performance. Closing a spring-loaded gripper is a safe (no weight lifting required) and guaranteed way to boost grip strength.
Like the pec stick, a gripper can also be used to amp up other exercises.
Sandbags can be used to load up nearly any lift. Because there’s no dedicated handle, you have to wrestle to hold, hug, lift, and carry the bag any way you can. This is “odd object” training and is a fun way to add a touch of “real life” functionality to your lifts.